Interconnect XiVO with a PBX via an ISDN link
The goal of this architecture can be one of:
start a smooth migration between an old telephony system towards IP telephony with XiVO
bring new features to the PBX like voicemail, conference, IVR etc.
First, XiVO is to be integrated transparently between the operator and the PBX. Then users or features are to be migrated from the PBX to the XiVO.
Warning
It requires a special call routing configuration on both the XiVO and the PBX.
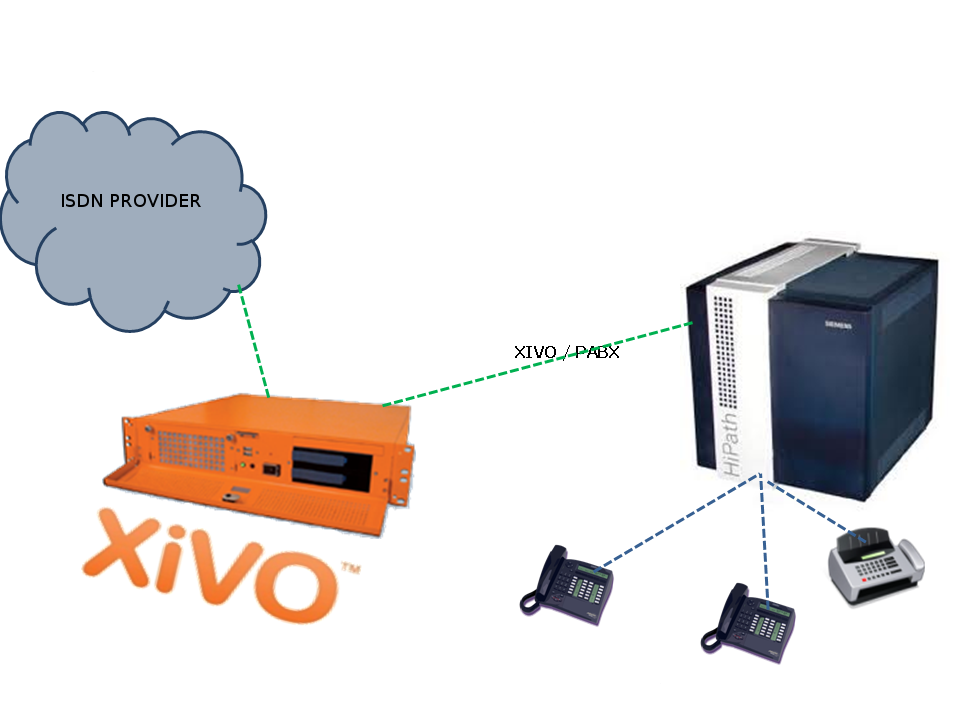
Interconnect XiVO with a PBX
Hardware
General uses
You must have an ISDN card able to support both the provider and PBX ISDN links.
Example : If you have two provider links towards the PBX, XiVO should have a 4 spans card : two towards the provider, and two towards the PBX.
If you use two cards
If you use two cards, you have to :
Use a cable for clock synchronization between the cards
Configure the wheel to define the cards order in the system.
Please refer to the section Sync cable
Configuration
You have now to configure two files :
/etc/dahdi/system.conf/etc/asterisk/dahdi-channels.conf
system.conf
You mainly need to configure the timing parameter on each span. As a general rule :
Provider span - XiVO will get the clock from the provider : the
timingvalue is to be different from 0 (see /etc/dahdi/system.conf section)PBX span - XiVO will provide the clock to the PBX : the
timingvalue is to be set to 0 (see /etc/dahdi/system.conf section)
Below is an example with two provider links and two PBX links:
# Span 1: TE4/0/1 "TE4XXP (PCI) Card 0 Span 1" (MASTER)
span=1,1,0,ccs,hdb3         # Span towards Provider
bchan=1-15,17-31
dchan=16
echocanceller=mg2,1-15,17-31

# Span 2: TE4/0/2 "TE4XXP (PCI) Card 0 Span 2"
span=2,2,0,ccs,hdb3         # Span towards Provider
bchan=32-46,48-62
dchan=47
echocanceller=mg2,32-46,48-62

# Span 3: TE4/0/3 "TE4XXP (PCI) Card 0 Span 3"
span=3,0,0,ccs,hdb3         # Span towards PBX
bchan=63-77,79-93
dchan=78
echocanceller=mg2,63-77,79-93

# Span 4: TE4/0/4 "TE4XXP (PCI) Card 0 Span 4"
span=4,0,0,ccs,hdb3         # Span towards PBX
bchan=94-108,110-124
dchan=109
echocanceller=mg2,94-108,110-124
dahdi-channels.conf
In the file /etc/asterisk/dahdi-channels.conf you need to adjust, for each span :
group: the group number (e.g.0for provider links,2for PBX links),context: the context (e.g.from-externfor provider links,from-pabxfor PBX links)signalling:pri_cpefor provider links,pri_netfor PBX side
Warning
most of the PBX uses overlap dialing for some destination (digits are sent one by one
instead of by block). In this case, the overlapdial parameter has to be activated on the PBX
spans:
overlapdial = incoming
Below an example of /etc/asterisk/dahdi-channels.conf:
; Span 1: TE4/0/1 "TE4XXP (PCI) Card 0 Span 1" (MASTER)
group=0,11
context=from-extern
switchtype = euroisdn
signalling = pri_cpe
channel => 1-15,17-31

; Span 2: TE4/0/2 "TE4XXP (PCI) Card 0 Span 2"
group=0,12
context=from-extern
switchtype = euroisdn
signalling = pri_cpe
channel => 32-46,48-62

; PBX link #1
; Span 3: TE4/0/3 "TE2XXP (PCI) Card 0 Span 3"
group=2,13
context=from-pabx     ; special context for PBX incoming calls
overlapdial=incoming  ; overlapdial activation
switchtype = euroisdn
signalling = pri_net  ; behave as the NET termination
channel => 63-77,79-93

; PBX link #2
; Span 4: TE4/0/4 "T4XXP (PCI) Card 0 Span 4"
group=2,14
context=from-pabx     ; special context for PBX incoming calls
overlapdial=incoming  ; overlapdial activation
switchtype = euroisdn
signalling = pri_net  ; behave as the NET termination
channel => 94-108,110-124
Passthru function
Route PBX incoming calls
We first need to create a route for calls coming from the PBX
# Create a file named pbx.conf in the directory /etc/asterisk/extensions_extra.d/,
# Add the following lines in the file:
[from-pabx]
exten = _X.,1,NoOp(### Call from PBX ${CARLLERID(num)} towards ${EXTEN} ###)
exten = _X.,n,Goto(default,${EXTEN},1)
This dialplan routes incoming calls from the PBX in the default context of XiVO.
It enables call from the PBX :
* towards a SIP phone (in default context)
* towards outgoing destniation (via the to-extern context included in default context)
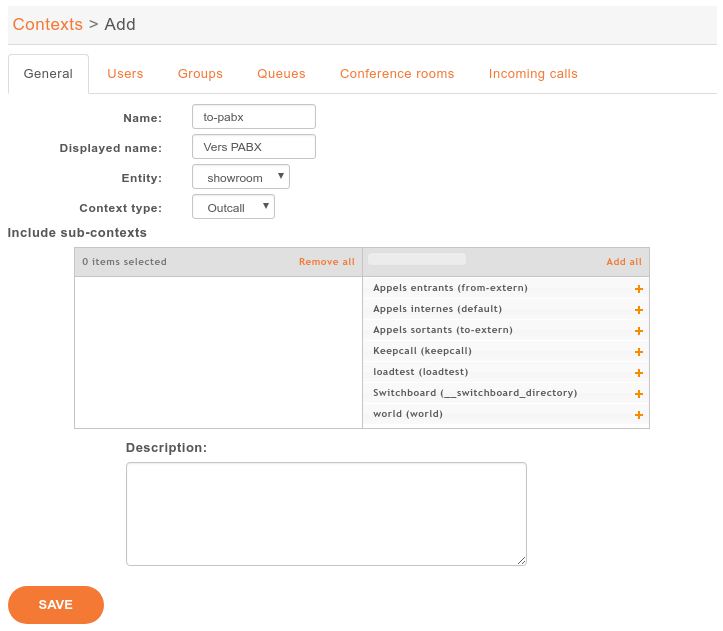
Create the to-pabx context
In the webi, create a context named to-pabx:
Name : to-pabx
Display Name : TO PBX
Context type : Outcall
Include sub-contexts : No context inclusion
This context will permit to route incoming calls from the XiVO to the PBX.
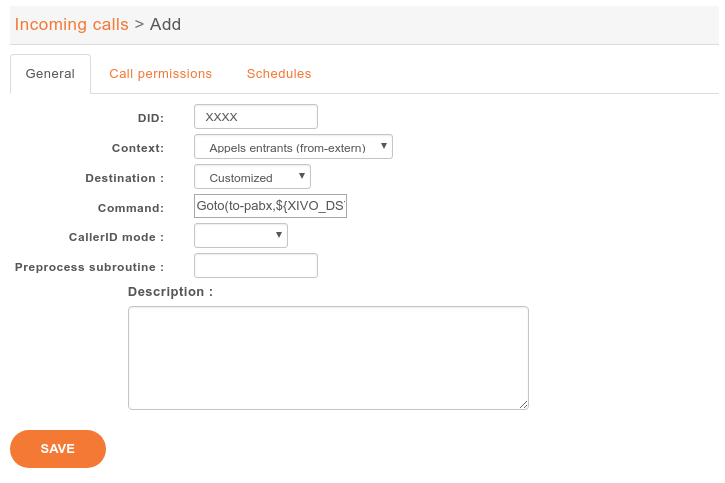
Route incoming calls to PBX
In our example, incoming calls on spans 1 and 2 (spans pluged to the provider) are routed by from-extern context. We are going to create a default route to redirect incoming calls to the PBX.
Create an incoming call as below :
DID : XXXX (according to the number of digits sent by the provider)
Context : Incoming calls
Destination : Customized
Command : Goto(to-pabx,${XIVO_DSTNUM},1)
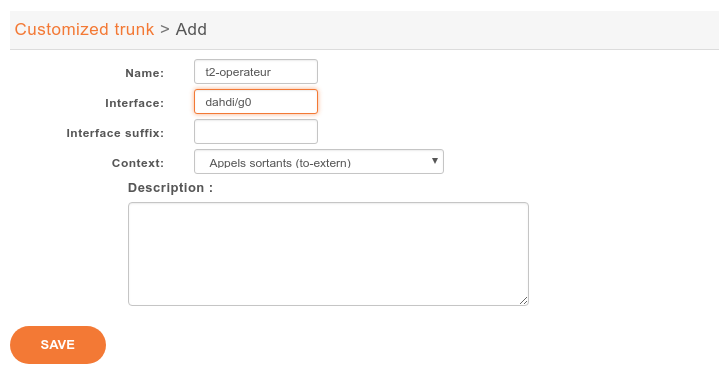
Create the interconnections
You have to create two interconnections :
provider side : dahdi/g0
PBX side : dahdi/g2
In the menu page :
Name : t2-operateur
Interface : dahdi/g0
Context : to-extern
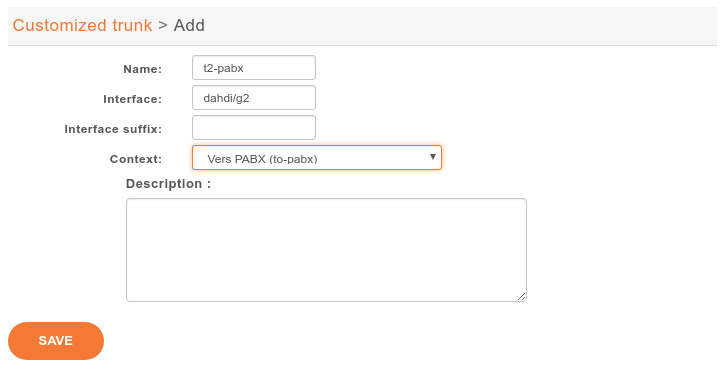
The second interconnection :
Name : t2-pabx
Interface : dahdi/g2
Context : to-pabx
Create outgoing calls
You must create two rules of outgoing calls in the menu page :
Redirect calls to the PBX :
Name : fsc-pabx
Extension : XXXX
Context : to-pabx
Trunks : choose the t2-pabx interconnection
Create a rule “fsc-operateur”:
Name : fsc-operateur
Extension = X.
Context : to-extern
Trunks : choose the “t2-operateur” interconnection