Resilience Installation
Important
Before installing, make sure you understand the Resilience Architecture and links between components.
This page describes the necessary steps to install and configure the resilience solution in XiVO.
Overview
First the chosen XiVO deployment must be ready: whether it is intended to deploy a XiVO, a CC or an XDS solution, the deployment must be ready and configured.
Then a standby stack must be installed and configured - see Resilience Standby Stack Installation:
a second XiVO must be installed (which will be the standby node).
and for CC and XDS deployment: a second CC stack linked to the standby XiVO node must be installed.
Finally configure the Resilience itself - see Resilience Configuration Details:
Configure one XiVO as main and fill in the standby address (VoIP interface)
Configure the other XiVO as standby and fill in the main address (VoIP interface)
Configure file synchronization
Follow specific steps depending on the deployment type (XiVO, CC, XDS)
That’s it, you now have a HA configuration, and every hour all the configuration done on the main will be reported to the standby.
Resilience Standby Stack Installation
All Deployement
Important
This is a mandatory step which applies to all deployment types: XiVO, CC and XDS.
Install a standby XIVO and configure (i.e. pass the Wizard) it.
CC Deployement
Note
This applies to deployment types: CC and XDS.
Install and configure a standby CC linked to the standby XiVO previously installed: this means that when requested fill in the XiVO Standby IP address etc.
XDS Deployement
Note
This applies to deployment types: XDS.
Nothing to install
Edge Deployement
Note
This applies to deployment types: Edge.
On XiVO Standby configure the TURN secret for asterisk:
Run the following script to generate the credentials for the TURN server (the
<TURN_SECRET>is the secret generated during TURN Server Secret):xivo-edge-gen-turn-cred <TURN_SECRET>Note
This script will generate new turn username and password in
/etc/asterisk/rtp.d/01-xivo-edge-turn-cred.conf
On CC Standby follow XiVO CC configuration to make it Edge aware.
On Edge add two variables in edge .env for XiVO Standy and XiVOCC Standby (replace <…_IP> with their actual values):
XIVO_HOST_STANDBY=<XIVO_STANDBY_IP>
XIVOCC_HOST_STANDBY=<XIVOCC_STANDBY_IP>
Ensure both XiVO Main and Standby are registered in the edge .env for TURN configuration:
TURN_ALLOWED_PEERS="--allowed-peer-ip=<XIVO_MAIN_IP> --allowed-peer-ip=<XIVO_STANDBY_IP> --allowed-peer-ip=... (MDS_IP, MEETINGROOM_IP, etc)"
Resilience Configuration Details
Configure one XiVO as Main
Note
Step to be run on XiVO Main
In XiVO Web interface go to page
Select Type of this node to
MainChose whether to activate or not Automatic failover - see Failover Mode
In the Remote address enter the VoIP address of the Standby node
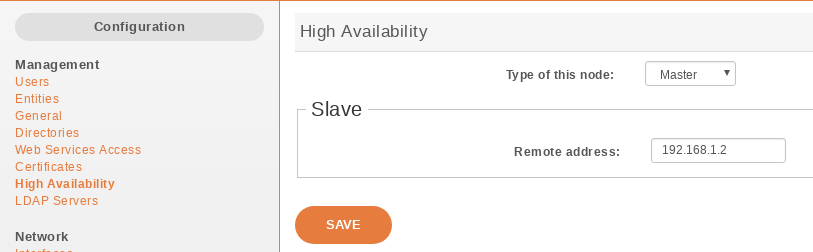
HA Dashboard Main
Restart all services on XiVO:
xivo-service restart all
Configure the other XiVO as Standby
Note
Step to be run on XiVO Standby
In XiVO Web interface go to page
Select Type of this node to
StandbyChose whether to activate or not Automatic failover - see Failover Mode
Important
Chose the same mode as on the XiVO Main
In the Remote address enter the VoIP address of the Main node
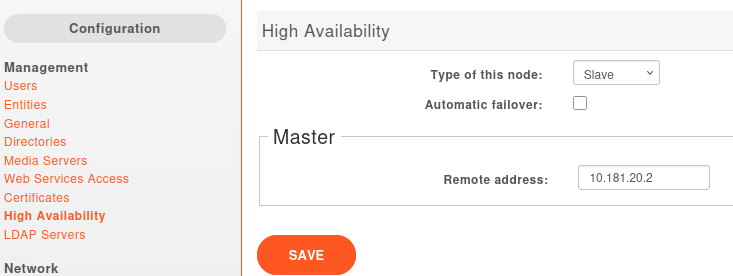
HA Dashboard Standby
Configure file synchronization
Note
Step to be run on XiVO Main
Configure file synchronization:
xivo-sync -i
Post-Configugration Steps
When HA nodes is configured and file synchronization is setup here are the remaining manual steps to do:
On XiVO Main:
Force a first synchronization:
Important
For the command below,
jqmust be installed and the file sync between Main and Standby must have been initiated - see Configure file synchronization.XSTANDBY_ADDR=$(cat /etc/xivo/ha.conf |jq .remote_address|tr -d '"') /usr/sbin/xivo-master-slave-db-replication $XSTANDBY_ADDR /usr/bin/xivo-sync
On XiVO Standby:
Force an update of the XIVO_UUID:
function remove_xivo_uuid_from_env() {
   local sed_args_forsystemd=(-i 's/"XIVO_UUID=[a-f0-9\-]\{36\}"//g' /etc/systemd/system.conf)
   local sed_args_env=(-i '/export XIVO_UUID/d' /etc/default/xivo)
   if sed "${sed_args_forsystemd[@]}" && sed "${sed_args_env[@]}" && rm -f /etc/profile.d/xivo_uuid.sh; then
      true
   else
      false
   fi
}
echo ""
echo "Current UUID in env and conf"
grep XIVO_UUID /etc/profile.d/xivo_uuid.sh /etc/systemd/system.conf /etc/default/xivo
echo ""
echo "Removing current UUID from env and conf"
remove_xivo_uuid_from_env
echo ""
echo "Updating UUID in conf"
xivo-configure-uuid
Restart services:
xivo-service restart all
Specific steps
Note
Specific steps depending on the deployment type.
CC Deployment
Nothing to do yet.
XDS Deployment
The XiVO Main & Standby must share the same AMI secret. If you need to change it, adapt the standby stack with the master secret this way:
On XiVO Main execute the following which will configure the same AMI secret for xuc user on Main and Standby:
Important
For the command below,
jqmust be installed and the file sync between Main and Standby must have been initiated - see Configure file synchronization.XMASTER_AMI_SECRET=$(grep -oP '^\s*secret\s*=\K.*' /etc/asterisk/manager.d/02-xivocc.conf) XSTANDBY_ADDR=$(cat /etc/xivo/ha.conf |jq .remote_address|tr -d '"') ssh -i /root/.ssh/xivo_id_rsa root@$XSTANDBY_ADDR "sed -i 's/secret.*/secret =$XMASTER_AMI_SECRET/' /etc/asterisk/manager.d/02-xivocc.conf; asterisk -rx 'manager reload'" XSTANDBY_AMI_SECRET=$(ssh -i /root/.ssh/xivo_id_rsa root@$XSTANDBY_ADDR "grep -oP '^\s*secret\s*=\K.*' /etc/asterisk/manager.d/02-xivocc.conf") if [ "$XMASTER_AMI_SECRET" == "$XSTANDBY_AMI_SECRET" ]; then echo "Good! AMI secret are the same !" else echo "Wrong! AMI secret are still not the same. Please check manually" fi
On CC Standby:
edit
/etc/docker/compose/custom.envand setXIVO_AMI_SECRETwith the same value as in the XiVOCC Mainrecreate xucserver:
xivocc-dcomp up -d xuc
xivocc-dcomp restart xuc # To be sure xuc is restarted anyway
Each MDS needs the Standby CC to be able to establish connection as well as the Main Xuc.
Note
Step to be done on each MDS nodes
On each MDS:
edit the existing
/etc/asterisk/manager.d/02-xuc.confto add a new permit line (replaceXIVOCC_STANDBY_IPwith actual Standby XiVOCC IP address):permit=XIVOCC_STANDBY_IP/255.255.255.255`
reload AMI:
asterisk -rx "manager reload"