Installation
This page describes how to install the XiVO CC.
It describes the installation with the debian package of the whole XiVO CC.
Note
As a reference, the manual installation page is here Manual configuration and installation.
Warning
If you configure HA on XiVO, you have to re-configure postgres to accept connection of XiVO CC - see PostgreSQL configuration section
By default XiVO CC installation will pre-empt network subnets 172.17.0.0/16 and 172.18.0.0/16 If this subnet is already used, some manual steps will be needed to be able to install XiVO CC. These steps are not described here.
Overview
The following components will be installed :
XuC : outsourced CTI server providing telephony events, statistics and commands through a WebSocket
XuC Management : supervision web pages based on the XuC
Pack Reporting : statistic summaries stored in a PostgreSQL database
SpagoBI : BI suite with default statistic reports based on the Pack Reporting
Recording Server : web server allowing to search recorded conversations
Xuc Rights Management : permission provider used by XuC and Recording Server to manage the user rights
Prerequisites
We will assume your XiVO CC server meets the following requirements:
OS : Debian 11 (Bullseye), 64 bits.
ssh key on XiVO CC to access XiVO PBX : see SSH Key configuration
You MUST have a XiVO PBX server to work with XiVO CC that is:
having OpenSSH
PermitRootLoginset toyes(you could revert tonoafter installation of XivoCC);installed in a compatible version (basically the two components XiVO and XiVO CC have to be in the same version).
reachable on the network (ping and ssh between XiVO CC and XiVO PBX must be possible).
setup (wizard must be passed) with users, queues and agents, you must be able to place and answer calls.
A part of the XiVO CC install aims to reconfigure XiVO PBX. You can start installing XiVO CC without XiVO PBX ready at first (or installing both in parallel). But if you do so you will need to do the reconfiguration part later, once XiVO PBX is properly set up (XiVO CC cannot work without it). See more details below.
For the rest of this page, we will make the following assumptions :
the XiVO PBX has the IP 192.168.0.1
some data (incoming calls, internal calls etc.) might be available on XiVO (otherwise, you will not see anything in the check-list below).
the XiVO CC server has the IP 192.168.0.2
SSH Key configuration
It is mandatory that your XiVO CC can access XiVO PBX through ssh using an ssh key. The ssh key name or type does not matter, use whichever you like. On XiVO CC, you can generate it this way :
ssh-keygen
You can then use ssh-copy-id once to configure that key as a way to connect to XiVO PBX.
ssh-copy-id root@192.168.0.1
Note that ssh-copy-id requires the user prompt, PermitRootLogin on the XiVO PBX VM and (obviously) the XiVO PBX root password.
Alternatively, if you do have a ssh key on XiVO PBX, you can manually register XiVO PBX among XiVO CC’s known hosts. This does not requires user prompt. Run on XiVO CC :
ssh-keyscan 192.168.0.1 | grep -P "^192.168.0.1" >> /root/.ssh/known_hosts
If those methods did not work, you may configure the ssh access on XiVO CC to the XiVO PBX with xivocc’s ssh key in ~/.ssh/config with an entry such as
Host 192.168.0.1
  IdentityFile ~/.ssh/id_rsa
You know it’s working well when the following commands executes on XiVO CC with neither errors nor cli prompt :
ssh root@192.168.0.1 'echo "hello $(uname -n)"' | cat
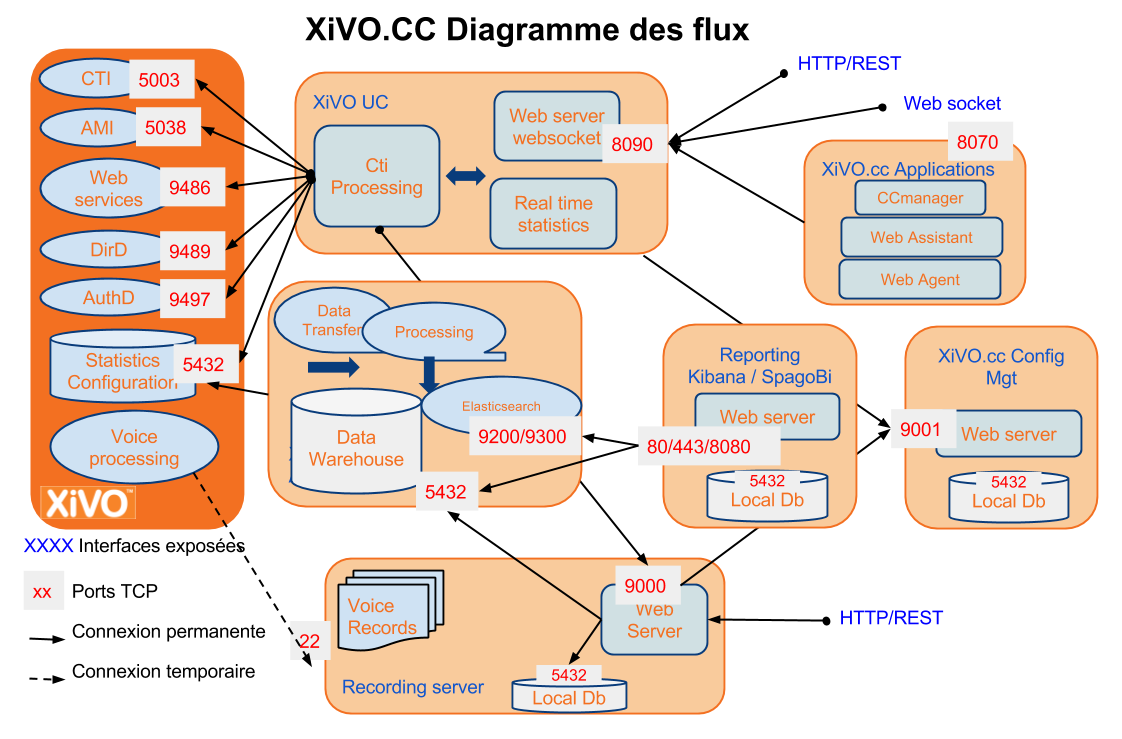
Architecture & Flows
This diagram is very important and shows the architecture between the different components inside XiVO CC and also interactions with XiVO PBX components.
XiVO PBX Restrictions and Limitations
XiVO PBX enables a wide range of configuration, XiVO-CC is tested and validated with a number of restriction concerning configurations of XiVO PBX:
General Configuration
Do not activate Contexts Separation in xivo-ctid Configuration
Users deactivation is not supported
Queue Configuration
Queue ringing strategy should not be Ring All
Do not use pause on one queue or a subset of queues status, only pause or ready on all queues
Do not activate Call a member already on (Asterisk ringinuse) on xivo queue advanced configuration
When creating a new queue, this queue will not appear immediately in CCAgent and CCManager until the agent or the manager is not relogged to these applications accordingly.
When deleting an existing queue, this queue will still appear in CCAgent and CCManager until the Xuc server is not restarted.
User And Agent Configuration
All users and queues have to be in the same context
Agent and Supervisors profiles should use the same Presence Group
Agents and Phones should be in the same context for mobile agents
Agents must not have a password in XiVO agent configuration page
All users must have the supervision on the XiVO (IPBX-Users-Edit-Services-Enable supervision checked)
When and agent is disassociated from its user, xuc server has to be restarted.
We strongly advise to not delete any user or agent to keep reporting available for them. Even so when an agent is deleted, xuc server has to be restarted,
Install process overview
Note
If your server needs a proxy to access Internet, configure the proxy for apt, wget and curl as documented in Proxy Configuration.
The install process consists of four parts:
The first part is to manually run the
xivocc_install.shscript to install the dependencies (ntp, docker, docker-compose…) and which will trigger the XiVO CC installation : Install from repositoryThe second part is to execute the after-install steps : After-install steps
The third part is to install the extra package for the chat : Chat Backend
The fourth part is to install the extra package for the recording : Recording
Install from repository
The installation and configuration of XiVO CC (with its XiVO PBX part) is handled by the xivocc-installer package which is available in the repository.
Configuration setup
For regular install
Beforehand, check that you know the following information, as they will be prompted :
XiVO PBX’s IP address (XIVO_HOST)
XiVO CC IP address (XUC_HOST)
Number of weeks to keep statistics (WEEKS_TO_KEEP)
Number of weeks to keep recordings (beware of disk space) (RECORDING_WEEKS_TO_KEEP)
The number of weeks to keep statistics must be higher than the number of weeks to keep recordings. Recording purging is based on the statistic data, so the statistic data must not be removed before purging recordings.
For silent install
You can pass those parameters in the custom.env on your XiVO CC if you don’t want to be prompted :
Warning
Even if you’re installing an edge, XUC_HOST must be the XIVOCC IP at installation time. You’ll have to change it to the edge’s FQDN later
mkdir -p /etc/docker/compose
echo "XIVO_HOST=<IP ADDRESS OF THE XIVO>
XUC_HOST=<CC IP>
CONFIGURE_REPLY=true
WEEKS_TO_KEEP=<Number of weeks to keep>
RECORDING_WEEKS_TO_KEEP=<Number of recording weeks to keep>
RESTART_REPLY=true" > /etc/docker/compose/custom.env
CONFIGURE_REPLY tells whether or not to connect on the XiVO PBX and finish its reconfiguration during the CC install.
RESTART_REPLY tells whether or not to restart the XiVO PBX services after the reconfiguration.
According your XiVO PBX is ready (wizard is passed), set CONFIGURE_REPLY to true. If you’re doing the installations in parallel, set both variables to false and see XiVO CC reconfigures XiVO PBX after the silent install.
Download installer script
Once you have your Debian Bullseye properly installed on your XiVO CC VM, download the XiVO CC installation script and make it executable:
wget http://mirror.xivo.solutions/xivocc_install.sh
chmod +x xivocc_install.sh
Launch installation
./xivocc_install.sh -a 2024.05-latest
Launch installation in silent mode using the flag -s:
./xivocc_install.sh -s -a 2024.05-latest;
If you chose not to configure XiVO PBX during the installation, you have one more step to run here XiVO CC reconfigures XiVO PBX
XiVO CC reconfigures XiVO PBX
If you chose to reconfigure XiVO PBX with XiVO CC later, this is the additional step you have to do. First verify the following points :
you installed xivocc by running xivocc_install.sh without errors : Install from repository
you can access XiVO PBX from XiVO CC correctly : SSH Key configuration
your XiVO CC custom.env contains the correct configuration : Configuration setup
your XiVO PBX is ready (wizard is passed)
You must then run this on XiVO CC :
configure-pbx
After-install steps
Configure ntp server
The XiVO CC server and the XiVO PBX server must be synchronized to the same NTP source.
Recomended configuration : you should configure the NTP server of the XiVO CC server towards the XiVO PBX.
In our example it means to add the following line in the file /etc/ntp.conf:
server 192.168.0.1 iburst
Adjust xuc memory
Xuc memory must be increased on these installations:
Condition |
XUC Xmx |
|
|---|---|---|
Default |
Required |
|
> 50 agents or > 500 users |
2048m |
4096m |
Set new variable in the
/etc/docker/compose/custom.envfile:
JAVA_OPTS_XUC=-Xms512m -Xmx4g
Use the variable in the
/etc/docker/compose/docker-compose.ymlfile:
 xuc:
   ...
   environment:
   - JAVA_OPTS=${JAVA_OPTS_XUC}
Launch the services
Note
Please, ensure your server date is correct before starting. If system date differs too much from correct date, you may get an authentication error preventing download of the docker images.
After a successful installation, start docker containers using the installed xivocc-dcomp script:
xivocc-dcomp up -d
To restart XiVO services, on XiVO PBX server run
xivo-service restart all
Reinstallation
To reinstall the package, it is required to run apt-get purge xivocc-installer then apt-get install xivocc-installer. This will re-run the configuration
of the package, download the docker compose template and setup XiVO PBX.
Purging the package will also remove the xuc and stats users from the XiVO PBX database.
Known Issues
- To avoid uninstallation problems:
please use the following command to uninstall
apt-get purge xivocc-installerif the process is aborted, it will break the installation. Then run
apt-get purgeandapt-get installagain
Checking Installed Version
Version of the running docker containers can be displayed by typing (see Show containers and images versions for other commands):
xivocc-dcomp version
Component version can also be found in the log files and on the web pages for web components.
Using XivoCC
The various applications are available on the following addresses:

Xuc-related applications: https://192.168.0.2
SpagoBI: https://192.168.0.2/SpagoBI
Config Management: https://<XiVO IP Address>/configmgt/ or https://192.168.0.2/configmgt/
Recording server: https://192.168.0.2/recording
Fingerboard: https://192.168.0.2/fingerboard
Chat Backend
Since Electra version, you MUST install and configure the chat backend to have the Chat feature working properly.
Installation type:
UC Addon: the chat backend package must be installed on the XiVO PBX with the UC Addon.
CC/UC mono-server: the chat backend package must be installed on your CC/UC server.
CC/UC multi-server: the chat backend package must be installed on the server which hosts the
xuc. You will be asked to give the IP Address of the server hosting thepgxivocc.
Warning
Installing the Chat backend will configure a linux user on the host
with UID 2000. Therefore you should check that no user with UID 2000 (you can do it with command id 2000)
is existing on the host before installing the Chat backend.
Warning
XiVO CC containers will be recreated. Therefore you must not install the chat backend before initialization of all databases in pgxivocc was completed. DB replication to the stats database must be also completed before installing the chat backend.
Chat Backend Installation
Install the
xivo-chat-backendpackage on your XIVO CC (on the server hosting thexucserver):apt-get install xivo-chat-backend
When done, run the configuration script:
/var/lib/xivo-chat-backend/scripts/xivo-chat-backend-initconfig.sh
Note
This will configure
the database
the chat backend (currently mattermost server)
and the link between xuc and mattermost services
Post Installation
User Configuration
You should configure users and their rights in the Configuration manager http://<XiVO IP Address>/configmgt/ (default user avencall/superpass).
Warning
If you change the cti login username in xivo configuration, user has to be recreated with apropriate rights in configuration manager.
Spagobi Setup
Documentation was moved to Queue statistics
Post Installation Check List
All components are running : xivocc-dcomp ps
Xuc internal database is synchronized with xivo check status page with https://xivoccserver:8443/
CCManager is running, log a user and check if you can see and manage queues : https://xivoccserver/ccmanager
Check database replication status using spagobi system report https://xivoccserver/SpagoBI
Check that you can listen to recordings https://xivoccserver/recording
Recording
This feature needs additional configuration steps on XiVO PBX, see:
and (optionally) Recording filtering configuration.