UC Assistant
Note
This section describes the feature of the UC Assistant application. It is available as a web application from your Web Browser. It is also available as a desktop application with these additionnal features:
show OS integrated notifications when receiving call
get keyboard shortcut to answer/hangup and make call using Select2Call feature
open when machine startups
close in tray
To install the desktop application, see the desktop application installation page.
What is the XiVO UC Assistant ?
The XiVO UC Assistant is a Web application that enables a user to:
search contacts and show their presence, phone status
make calls through physical phone or using WebRTC
transfer incoming or outgoing calls
access voicemail
enable call forwarding and Do Not Disturb (aka DND)
show history of calls
chat between XiVO users also using UC assistant
Login
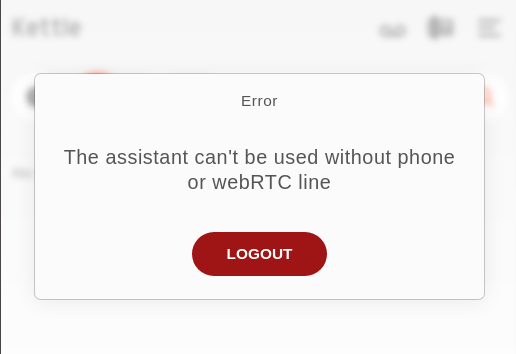
To login, you must have a user configured on the XiVO PBX with:
CTI Login enabled,
Login, password and profile configured
A configured line with a number
Warning
If a user tries to login without a line, an error message is displayed and user is redirected to the login page (this applies also to Desktop Applications )
Note
Automatic login keeps you signed in until you log out.
Search
You can use the search section to lookup for people in the company, results will display all information known for the user (phone numbers and email).
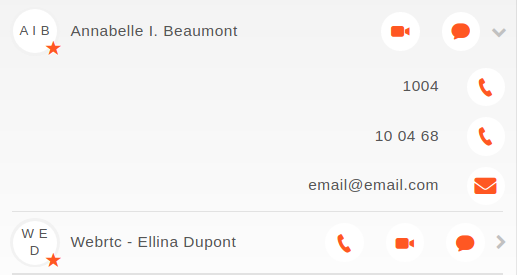
On the line of the user, you will see the following actions :
start call : will call the default phone number
start chat conversation (if it is a XiVO user)
start video call (if the video calls are available for this user)
When clicking on the line, a sub-menu opens with the following actions:
For phone numbers entries:
display of all the phone numbers available for this user
start call by clicking on the phone icon
copy the phone number into your clipboard by clicking on it (to paste it elsewhere)
For email entry:
start writing an email (it will open the user’s configured email client)
Note
by default only the email destination is pre-filled but you can also pre-fill the email subject and body via a template - see Email Template
copy email into your clipboard (to paste it elsewhere)
Important
Integration: to enable this feature, you must configure the directories in the XiVO PBX as described in Directories and Views.
Though the UC Assistant only supports the display of:
1 field for name (the one of type name in the directory display)
3 numbers (the one of type number and the first two of type callable)
and 1 email
Forwarding Calls and DND
From UC Assistant you can activate Do Not Disturb to block all incoming calls or forward call to any another number just by clicking on action button as seen on following screenshot:

You can then change your settings and enable them.
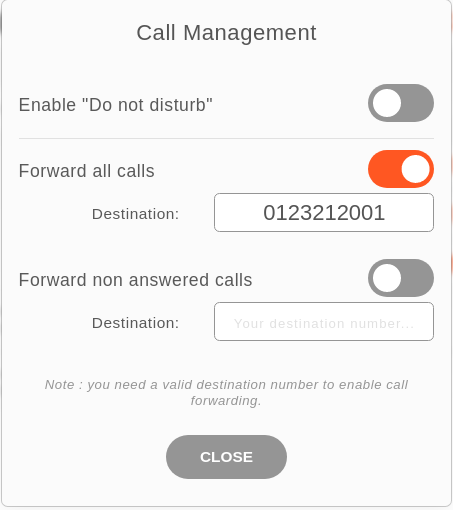
Action possibles are :
Enable DND
Disable DND
Edit call forwarding (for both unconditional or on missed call only)
You know that all incoming calls will be rejected once you see the following logo in the header bar :
All calls are forwarded once you see this following one :
Finally, calls are forwarded only if you missed it when you see this one :
Note
If calls are redirected, the forward number will be shown under your name.
Nevertheless, there is a precedence, if DND mode is enabled and also call forwarding, calls will be rejected.
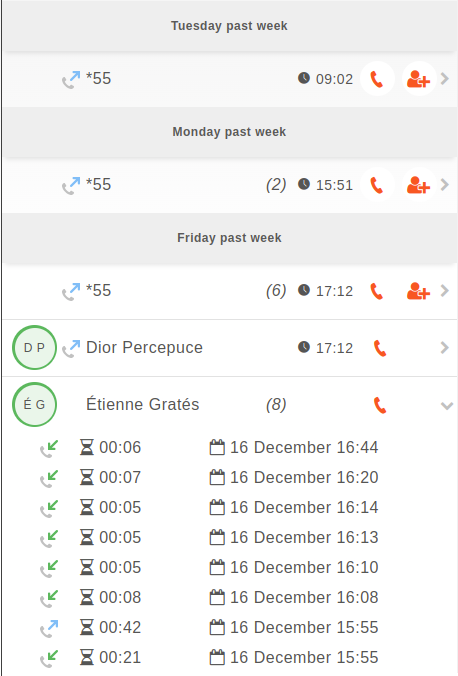
Call history
The call history tab lists all the recent calls you were part of. For each call, it displays the status (received, emitted…), the duration, as well as the time when the call happened. You also see the phone status of internal users. You can hover your mouse cursor on a call to add this phone to your contact, or call it. You can also click on it to unfold it and see the call(s) details.
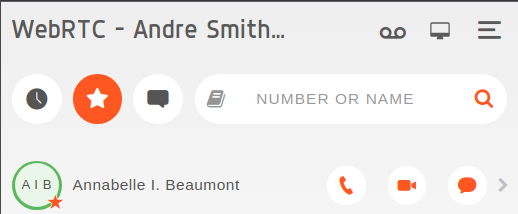
Favorites
Click on the star to put a contact in its list of favorites. Favorites must be configured in the XiVO PBX as described in Favorites.
Personal contacts
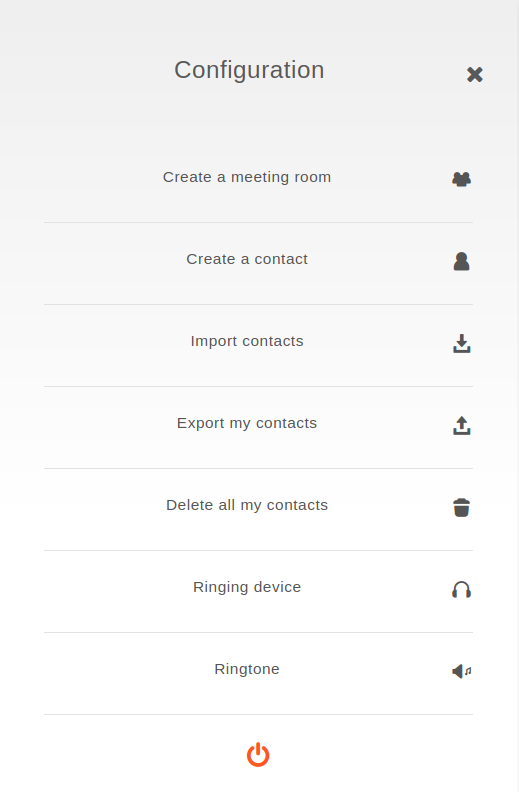
From top-right hamburger menu, it is possible to display additional actions to handle you personal contacts. You will be able to create, delete all, import and export personal contact that you will be either able to search from the toolbar or find them in favorites panel if starred.

Create a personal contact
Just fill wanted fields (such as name and number), click on star if you want this contact to be displayed in favorites panel.
Warning
It is not possible to have twice the same personal contact, at least one field must differ.
Warning
Every contact must have at least a name (either firstname or lastname) and a number (either number, mobile or other number).
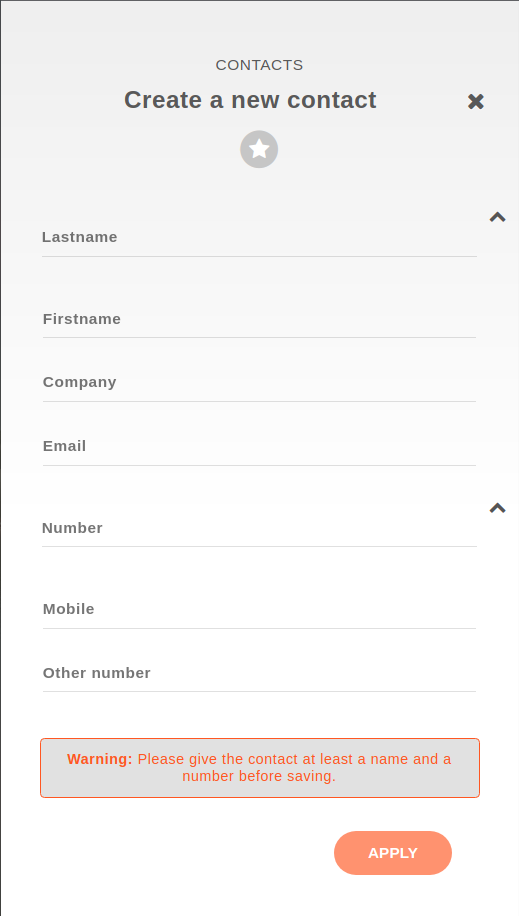
It’s also possible to create a personal contact from call history by hovering a call item and so have pre-filled fields.
Edit a personal contact
To edit a personal contact, you should search it first, and a pencil icon will be displayed on the user line as in the following screen:

Once clicked, you are redirected to edition pane where you just fill wanted fields.
Delete a personal contact
To delete a personal contact, you should edit it first, then you just need to click on trashcan icon :

Once clicked, you are invited to confirm or not the deletion of this contact.
Import personal contacts
From menu, you can upload a .csv file that contains all the data of your personal contacts. You can either use a file exported from this same interface or create yours.
Here are the list of available attributes of a personal contact:
companyemailfaxfirstnamelastnamemobilenumber
As an example here a csv file that can be imported
company,email,fax,firstname,lastname,mobile,number
corp,jdoe@company.corp,3333,John,Doe,2222,1111
Note
File exported from previous xivo-client is also compatible with UC assistant.
Reverse lookup
By default, reverse lookup is enabled for personal contact display on incoming calls. Configuration is set to display firstname and lastname if number or mobile matches an existing personal contact.
Phone integration
The UC Assistant can integrate with the phone to :
Call / Hangup
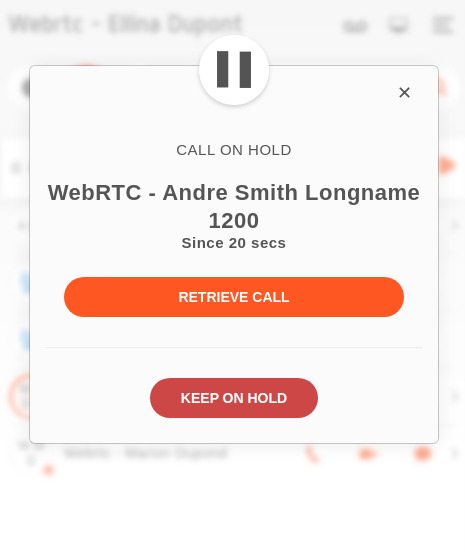
Put on hold
Do direct or attended transfers - check Known limitations
Initiate 3-party conference - check Known limitations
As these features are closely linked to the phone to work, you must check supported phones for UC Assistant and follow the Required configuration page.
Once, you’re phone is properly configured and you are connected as a user, you know that your using SIP phone once you see the following logo in the header bar :
On hold notifications
You can be notified if you forget a call in hold for a long time, see configuration section.
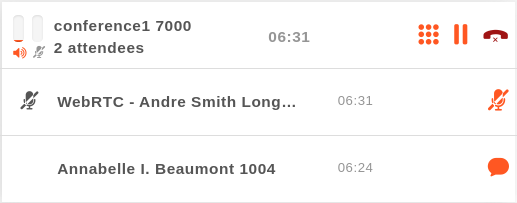
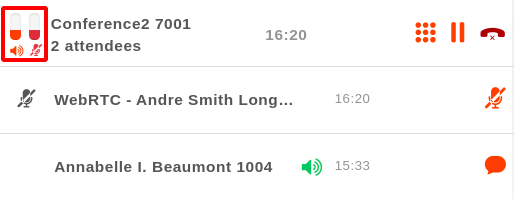
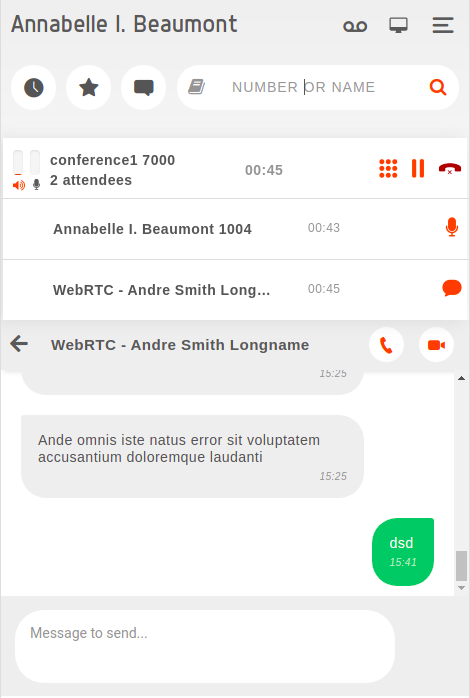
Conferences
When joining a conference, either as an attendee or an organizer, the UC Assistant will display specific informations about the conference you are joining.
Note
On WebRTC and Snom phones you can also do a device hosted three-party conference, in this section we describe features of the XiVO hosted conferences.
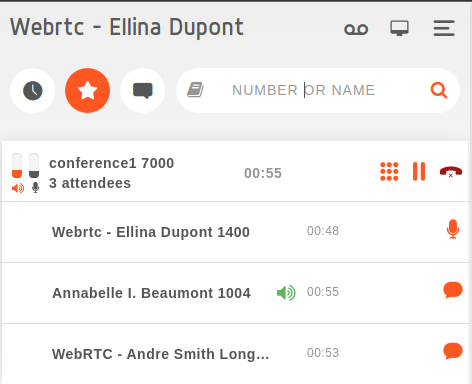
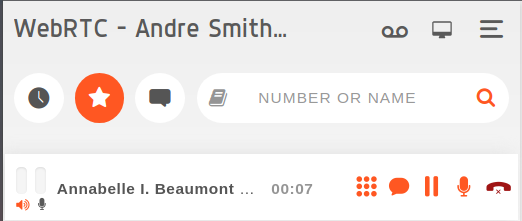
Conference information:
The timer next to the conference name displays how long the conference has been running.
The first line displays the number of attendee.
Conference actions:
As an attendee, you can only:
Exit a conference room by clicking the hangup button
Put the conference on hold. Other attendees will not hear any hold music (if you’re on the same XiVO) but will not be able to hear you neither you will be able to hear the conference room.
As an organizer, you will also be able to:
Mute/Unmute all other attendee in the conference room
Attendees information:
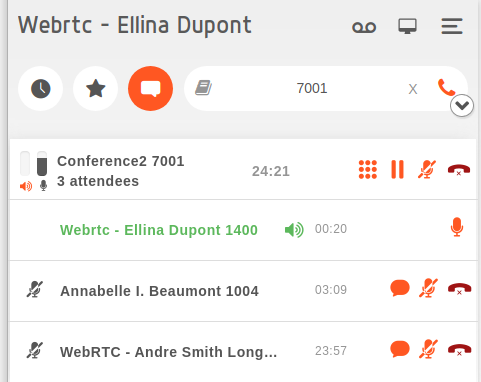
Attendees name, number and timer are displayed below the conference name
Attendees are ordered by name with the exception of the first one which always reflect the current user
Conference organizer are displayed in green
When an attendee is muted, a slashed microphone icon will be displayed next to its name
When an attendee is talking, a green speaker will be displayed next to its name
Attendee action:
Participant can :
Mute/Unmute itself. If the participant is muted and starts speaking, the microphone icon in the volume meter will blink in red as a reminder. This red warning only happens in audio conferences, not in normal phone calls.
Organizer can also:
Mute/Unmute any attendee
Kick out an attendee. A message will be played to the kicked out attendee before leaving the conference.
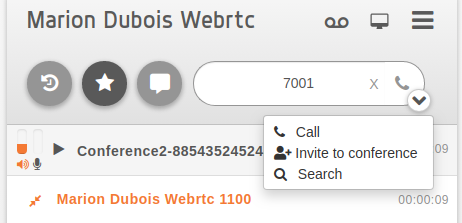
Invite a user to the conference.
This can be done by clicking the invite to conference button in the user dropdown menu :
from the favorites tab,
or from the search results, by searching for a username.
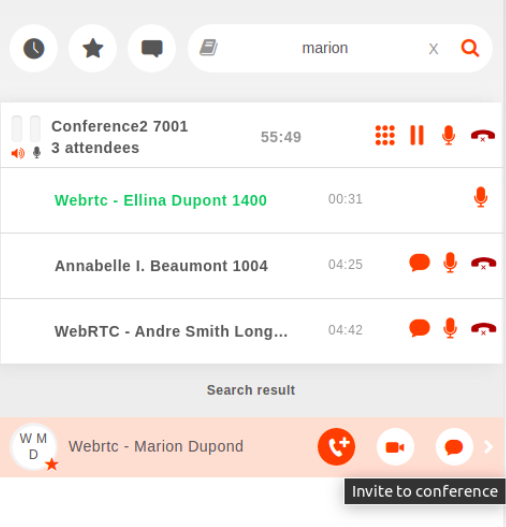
The organizer can also invite a phone number to a conference via the additional call options. This option will be displayed after the organizer starts typing a phone number in the search bar.
Instant Messaging
It is possible from the assistant to send chat messages and have private text conversation. It is possible to deactivate it if this feature is not suitable for your needs or if you have already an external chat application, see Disabling chat in UC Assistant and Switchboard.
There are two possible behaviors for handling messages:
No persistance (default) : Each message is an instant message that can be sent to another user logged in. messages are not stored anywhere and will be discarded once you refresh the page or log out.
With persistence : Can be enabled with Chat Backend. This allows then
To send messages to offline users
To retrieve you conversation history with other parties
To receive notifications when you logs in if you have unread messages that has been received while you were disconnected.
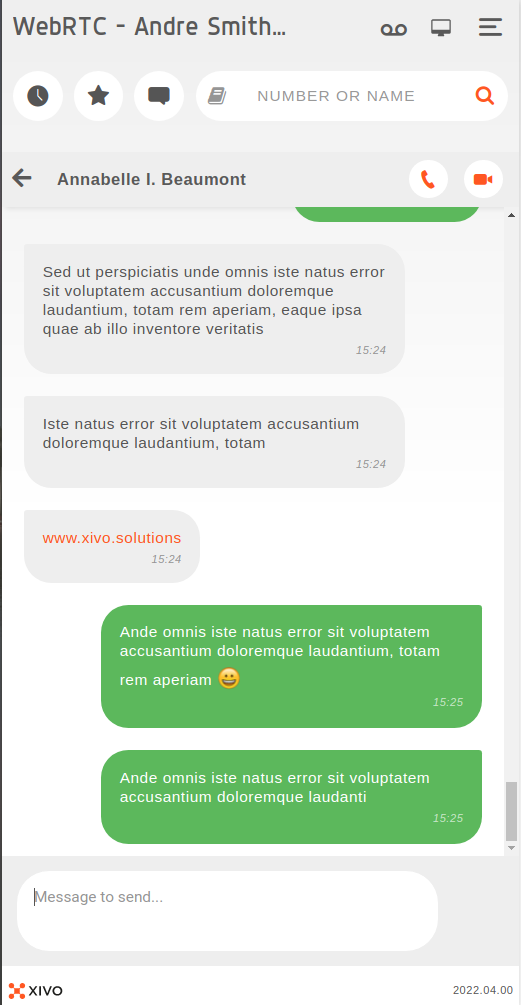
When you send a message, you are notified if the message was sent successfully or if the message was not received because the recipient is not logged in.
When you receive a message, you are notified with a orange badge on the message tabs. If you are using the desktop application, the electron tray icon also shows an orange badge. You will also have a notification from your web browser or a system notification if you are using the desktop application.
You can send links in message, they will be clickable. You can also write emojis from your keyboard (e.g., :smile:). You can find here some emojis exemple.
The conversation window also allows you to call a user on their internal phone number directly from the chat. To do so, you can click on the phone icon next to the name of the user you’re chatting with. If the video calls are available on your XiVO, you can launch one by clicking on the camera.

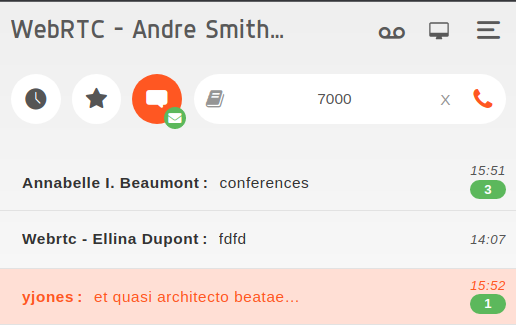
You can send a message from different places in the application :
From the contact line :
From an ongoing call :
from a conference call :
You are also able to list, at any time, all your ongoing conversation from the message tab :
External directory
This feature will add an additional book icon on the left side of the search bar. When clicking on this book icon, it will open (or close) the defined external directory (the external directory being a directory accessible via an URL).
To enable it, see configuration section.
Note
The search in the search bar will not search in this directory. But a search could be implemented in this external directory.
The screenshot below shows an example: when clicking on the book icon the external directory is shown. Here this external directory was developped to list users per site.
Logout
The logout button can be found after going in the top-right hamburger menu, which looks like the screenshot below :
You will then be brought back to the login page.
Meeting room
You can join an audio-video conference, called meeting room, which will open on the side of your application. See Meeting Rooms PRO for more information.
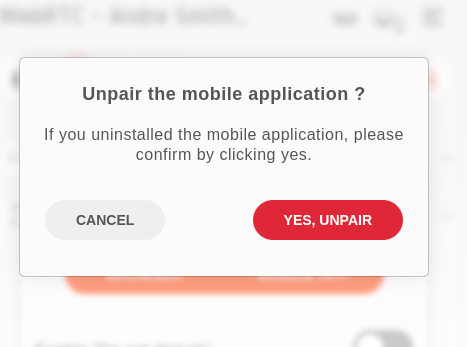
Using web and mobile applications together
Note
This section concerns only WebRTC users, not Unique Account or SIP phone users.
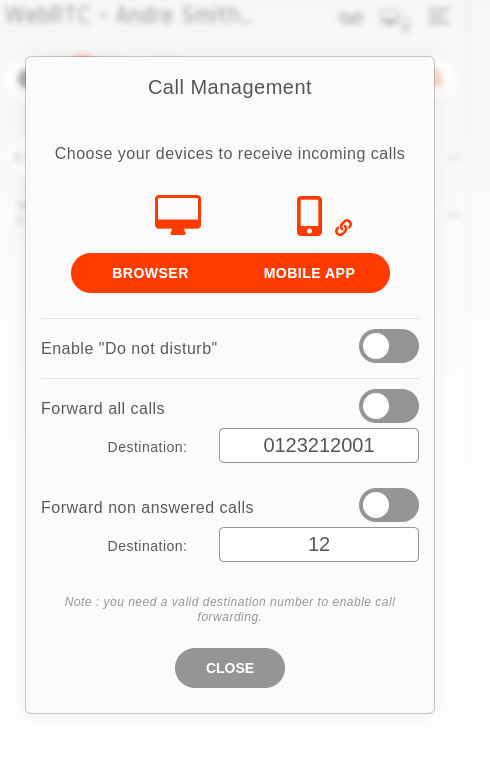
After a user connects to the mobile application for the first time, a pop up notification will be sent on their UCAssistant. This is to inform the user that they will now receive calls on both mobile and web application. The user will be able to change this by clicking on the call management section :
They can then choose if they want to receive calls on the mobile application, web application, or on both.
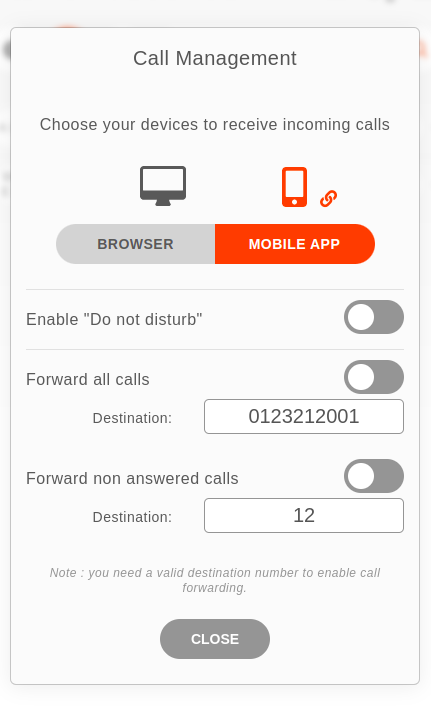
After a user uninstalled the mobile application, they can unpair the mobile app from the assistant by clicking on the chain icon next to the mobile option.