Web / Desktop Application
Common features
Disabling call group disconnection functionality
To prevent users from leaving a group in UC Assistant, set the UC_SHOW_GROUP_CONTROL environment variable to false in the /etc/docker/compose/custom.env file.
Disabling WebRTC
WebRTC can be disabled globally by setting the DISABLE_WEBRTC environment varibale to true in /etc/docker/compose/custom.env file.
Call History Number of Days
Call history by default shows the last 7 days. You can change it by setting the CALL_HISTORY_NB_OF_DAYS environment variable to a specific number of days in the /etc/docker/compose/custom.env file.
Warning
Note that setting this to a large number of days may slow down the solution.
Disabling chat in UC Assistant and Switchboard
The chat feature can be disabled globally by setting the DISABLE_CHAT environment varibale to true in /etc/docker/compose/custom.env file.
Disabling mail in UC Assistant
The mail action can be disabled globally by setting the DISABLE_MAIL environment varibale to true in /etc/docker/compose/custom.env file.
Disabling download desktop applications
To disable download buttons from the login page, you need to set SHOW_APP_DOWNLOAD to false in XiVO CC /etc/docker/compose/custom.env file.
Change default fallback language
Currently all web applications are translated in French if the locale of the browser (or the OS lang for desktop application) is not found. You can change, for example to fallback to english if the locale is not known by XiVO.
To do so, you need to set APP_LANG_FALLBACK in XiVO CC /etc/docker/compose/custom.env file with one of the following value:
fr: French (default)en: Englishde: German
External Directory
To enable External Directory feature you need to configure it in the /etc/docker/compose/custom.env file:
EXTERNAL_VIEW_URL=https://myxivocc/externaldir
Note
When EXTERNAL_VIEW_URL is set, it will be displayed in both UC Assistant and CC Agent
Warning
Take care of the following restrictions:
The
EXTERNAL_VIEW_URLmust be seen as hosted by XiVO CC platform (otherwise it won’t open because of CORS restriction).You MUST use the same HTTP protocol to access the CC application (UC Assistant or CC Agent) AND to access the external view. For example, if you access the application over HTTPS, you must access the external view over HTTPS too (to the avoid Mixed Content errors).
The external URL MUST NOT have the ‘X-Frame-Options’ to ‘sameorigin’, else the feature will not work (e.g. you can’t use google.com as directory…).
Credentials validity period
Warning
For security reasons, we strongly recommend to not change these options (i.e. to not raise the credential lifetime). This warning applies even more if you are connecting UC application through the XiVO Edge solutions (i.e. when the UC applications are opened on the Internet).
The default validity period for authentification credentials is one hour for a CTI user and one day for a web service user. This credential is automatically renewed while using the assistants. This is also the period during which you do not have to enter your password when reconnecting to the assistants.
This duration in seconds can be configured in the /etc/docker/compose/custom.env file:
AUTH_CTI_EXPIRES=3600
AUTH_WEBSERVICE_EXPIRES=86400
Email Template
To pre-fill email when clicking on the email button of XiVO users search results (see UC Assistant Search section) you need to create the /etc/docker/xucmgt/email.tpl file on XiVO CC server and add it as a volume in the yml file:
services:
  xucmgt:
    volumes:
    - /etc/docker/xucmgt/email.tpl:/opt/docker/conf/email.tpl
This template must be in a Json valid format and must contain the following fields:
field |
Description |
|---|---|
subject |
Pre-filled text for email subject |
body |
Pre-filled text for email body |
The template text can contain parameters that will be automatically replaced by actual value when clicking on email link. Format to include in text is {parameter}.
If the replacement is not possible the parameter will have to be changed by hand.
Parameter |
Description |
|---|---|
callernum |
The ongoing call caller phone number |
dstname |
The full name of search result associated to this email |
Here is a sample of a valid email template:
{
  "subject": "Information about missed call",
  "body": "Hello {dstname}, someone tried to reach you. He wants to be called back on {callernum}."
}
Warning
Take care of the following limitations:
Email display must be configured for directory search (see Directories and Personal contacts)
This features relies on the html mailto: tag therefore:
an email client must be configured for the email to be sent
beware of the URI maximum length for browser: the subject and body will be appended in a mailto: tag to the email address. Beware that there may be some limitations on the URI size (2000 characters might be good maximum as you can see in this stackoverflow post)
Template will apply to all users of the system on all applications (UC Assistant, CC Agent, Switchboard)
No carriage return can be put in the text template (email body will be only on 1 line)
Visioconference Email Template
To pre-fill email when clicking on the email button of a visioconference search results, you need to create the /etc/docker/xucmgt/emailInvite.tpl file on XiVO CC server and add it as a volume in the yml file:
services:
  xucmgt:
    volumes:
    - /etc/docker/xucmgt/emailInvite.tpl:/opt/docker/conf/emailInvite.tpl
This template must be in a Json valid format and must contain the following fields:
field |
Description |
|---|---|
recipient |
Pre-filled text for email to be sent to |
subject |
Pre-filled text for email subject |
body |
Pre-filled text for email body |
The template text can contain parameters that will be automatically replaced by actual value when clicking on email link. Format to include in text is {parameter}.
If the replacement is not possible the parameter will have to be changed by hand.
Parameter |
Description |
|---|---|
meetingroom_name |
The display name of the meetingroom |
meetingroom_link |
The link of the meetingroom for external participants |
meetingroom_number |
The meetingroom phone number for internal users |
You can also use “user data” parameters to enrich the email template ; it will be resolved if you have an ongoing call when clicking the email button.
Here is an example:
Given the dialplan sets the “user data” DATA1 with email and DATA2 with case id:
same = n,Set(USR_TITLE1=Email)
same = n,Set(USR_DATA1=user@email.com)
same = n,Set(USR_TITLE2=Case ID)
same = n,Set(USR_DATA2=11223344)
Then I can use the following template so that it is used if a call is ongoing with this caller:
{
  "recipient": "{attached_data_usr_data1}",
  "subject": "Invite to {meetingroom_name}",
  "body": "Hello, you can join me here {meetingroom_link} or at number {meetingroom_number} to discuss case {attached_data_data2}"
}
Note that the keys retrieved from user data will be matched in lowercase with the template. If the replacement is not possible in this case, the parameter will be removed automatically. This allows non-mandatory user data parameters.
Screen Popup
It is possible to display customer information in an external web application using Xivo sheet mecanism.
Go to to configure a sheet:
Tab General Settings: Give a name
Tab Sheet: You must define a sheet with at least
folderNumberandpopupUrlfields set:folderNumber(MANDATORY)field type =
textIt has to be defined. Can be calculated or use a default value not equal to “-”
Note: You could leave “empty” using a / symbol or using a whitespace (in hexadecimal: %20)
popupUrl(MANDATORY)field type =
textThe url to open when call arrives : i.e. http://mycrm.com/customerInfo?folder= the folder number will be automatically appended at the end of the URL
Additionally to the existing xivo variables, you can also use here the following variables(only available in Web Agent and Desktop Agent):
{xuc-token}: will be replaced by a token used for xuc websocket and rest api, for examplehttp://mycrm.com/customerInfo?token={xuc-token}&folder={xuc-username}: will be replaced by the username of the logged on user, for examplehttp://mycrm.com/customerInfo?username={xuc-username}&folder=
multiTab(OPTIONAL)field type =
textset to the text
trueto open each popup in a new window.
Then go to and choose the right events for opening the URL (if you choose two events, url will opened twice etc.)
Example : Using the caller number to open a customer info web page
Define
folderNumberwith any default value i.e. 123456Define
popupUrlwith a display value of http://mycrm.com/customerInfo?nb={xivo-calleridnum}&fn= when call arrives web page http://mycrm.com/customerInfo?nb=1050&fn=123456 will be displayed
Screen popup on UC Assistant
By default the sheet:
on CC Agent application the sheet is opened by default,
on UC Assistant application the sheet is not opened by default.
You can change the behavior with the following sheet variables:
popupUCActivated:if set to
truethe sheet will be opened on UC Assistant applicationif set to
false(default) the sheet won’t be opened on UC Assistant application
popupAgentActivated:if set to
true(default) the sheet will be opened on CC Agent applicationif set to
falsethe sheet won’t be opened on CC Agent application
For example, if you want the sheet to only open on UC Assistant application you should add in your sheet configuration:
in :
Tab Sheet add the following definition:
popupAgentActivatedfield type =
textdisplay value =
false
popupUCActivatedfield type =
textdisplay value =
true
Note
These variables can also be filled via a dialplan variable value with the UserEvent application and the {dp-...} syntax mechanism.
See the XiVO PBX sheet description.
Desktop Assistant Specific Features
Run executable
It is also possible to run an executable using Xivo sheet mecanism. This is only available in the desktop agent and desktop assistant.
Warning
For the executable to be run on a Desktop Assistant in UC mode, you need to activate the Screen popup on UC Assistant (in CC Agent mode the screen popup doesn’t need to be activated and therefore the executable will be run out-of-the-box).
Go to :
Tab General Settings: Give a name
Tab Sheet: You must define a sheet with at least
runAsExecutableandpopupUrlfields set:popupUrl(MANDATORY)field type =
textIt should contain an executable name accessible by the client user (where the desktop application is) or a full executable path.
runAsExecutable(MANDATORY)field type =
textDisplay value
true
executableArgs(OPTIONAL)field type =
textset the argument for the executable.
Then go to and choose the right events for starting the application.
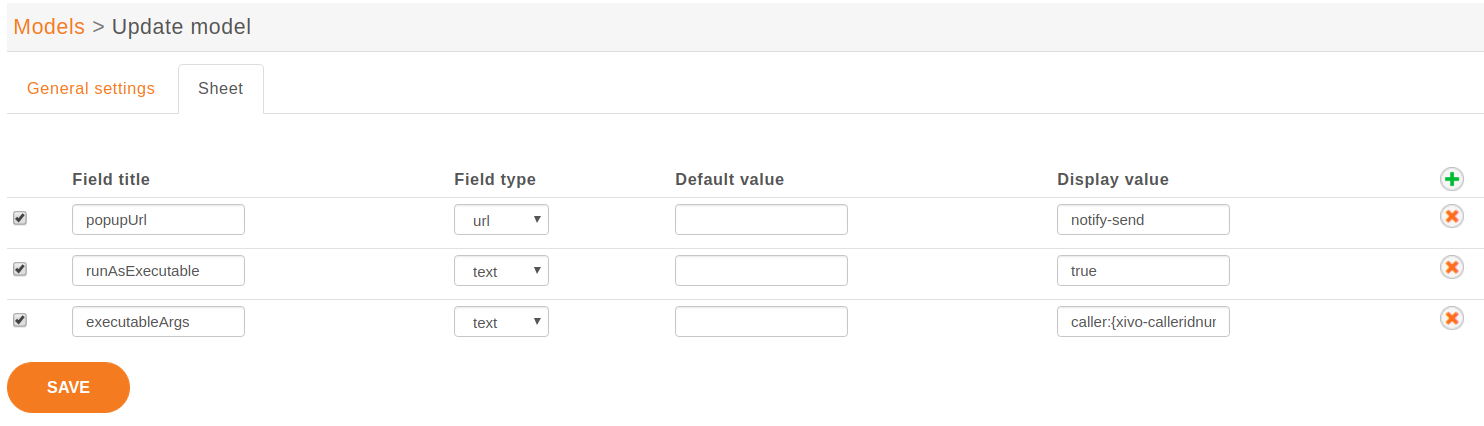
Example : Run the notify-send command on linux:
Define
popupUrlwith a display value ofnotify-sendDefine
runAsExecutablewith a display value oftrueDefine
executableArgswith a display value ofcaller:{xivo-calleridnum}where the variablexivo-calleridnumwill be replaced by the caller phone number.