Contact Center Management
Introduction
CCmanager is a web application to manage and supervise a contact center, different menus are available from hamburger icon with following features:
Start the application : http://<xucmgt:port>/ccmanager
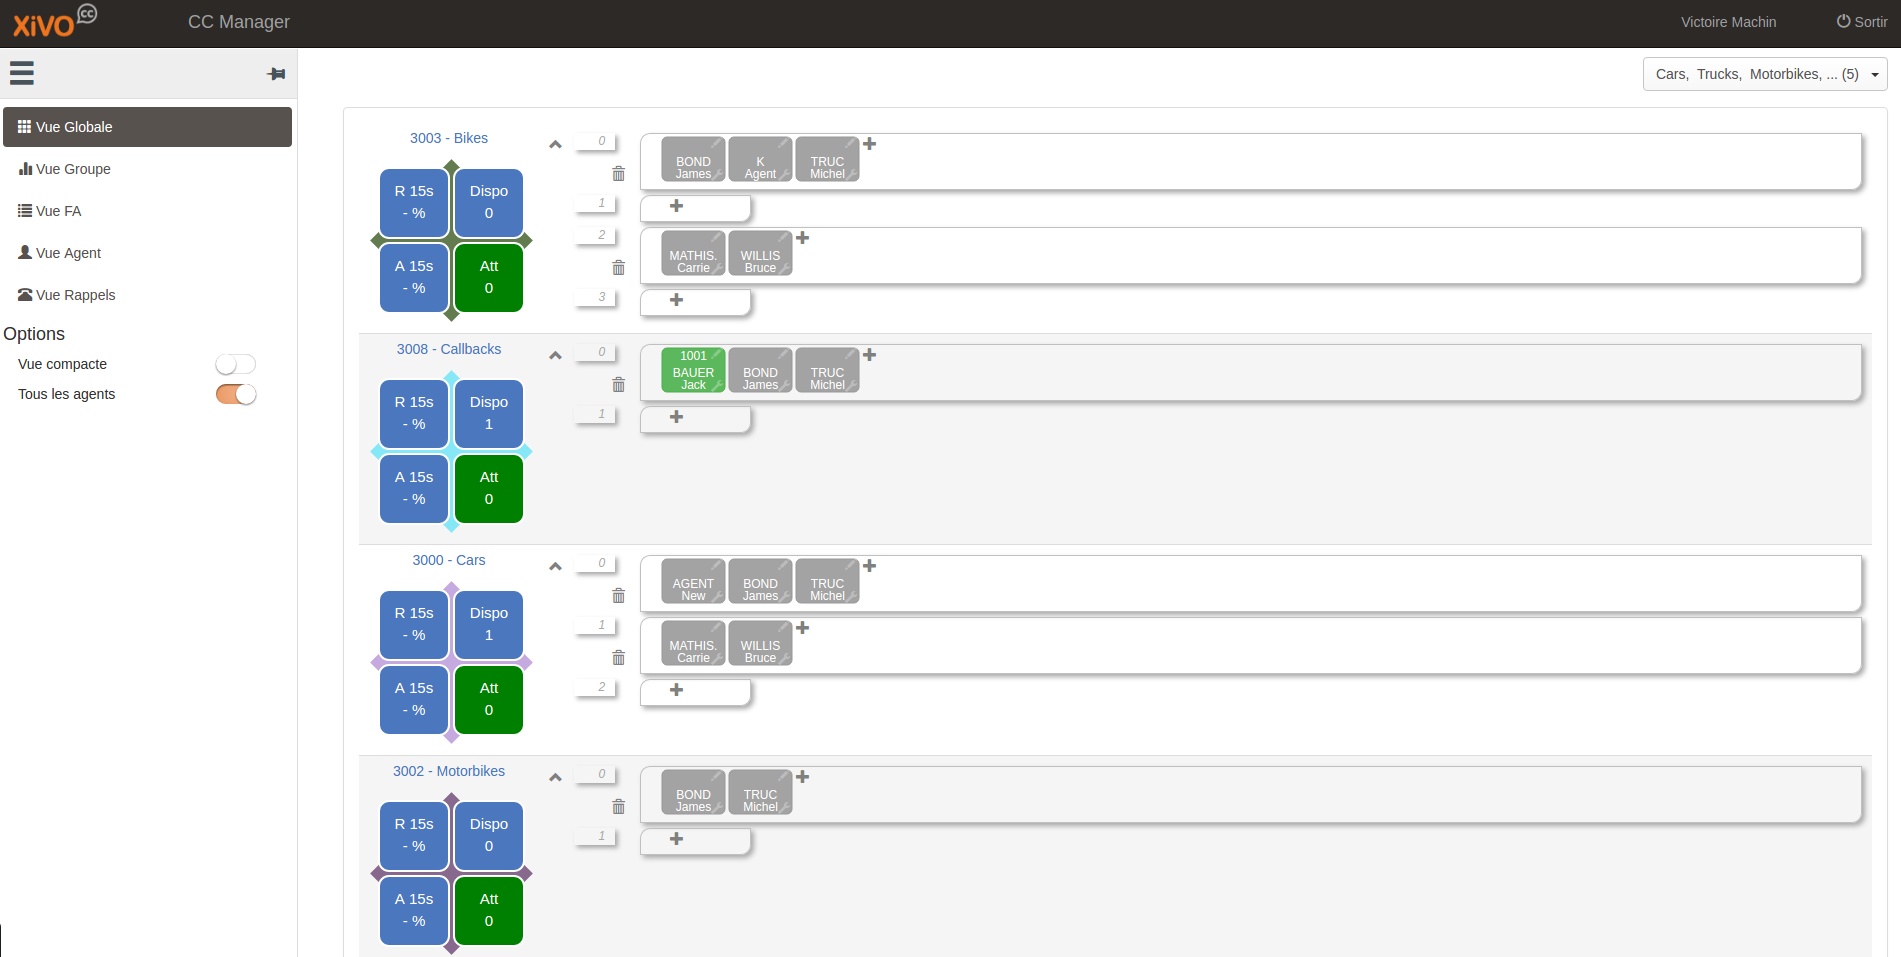
Global view
Queues and penalties with real time activity of each agent, possible options are
Enable Compact view (remove queue statistics)
Show/Hide agents that are not logged in
Manage agents in queues:
Group view
Distribution of agents per queues
Queue view
Activity per queue
Agent view
Activity per agent, possible Agents actions are [1]
Callback view
List of callbacks. See Callbacks.
Qualification view
To export calls qualification. See Exporting qualifications.
Agents actions
As a supervisor you have some actions available on agent [1]:
Listen to agent’s conversation
While an agent is on call, as a supervisor you can listen to it’s call. To do this:
use the Listen action on a agent,
then you’ll receive a call on your phone [2]
when answered you’ll be listening to the agent conversation
use DTMF to change listening mode:
4spy mode: the supervisor listens to the conversation5whisper mode: as spy mode plus the supervisor can speak to the agent without the other participant to hear6barge mode: as spy mode plus the supervisor can speak to both the agent and the other participant (e.g. the customer)
Note
By default when a supervisor spies on an agent the agent is only warned via the CC Agent Call control listen icon.
XiVO CC can be configured to warn the agent via a beep and/or a lit key on its deskphone - see Warn agent when spied.
Queue statistics
This diagram shows some aggregation about statistics collected from queue activity
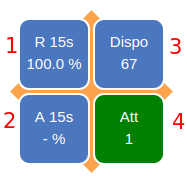
Those are the statistics available by default without configuration.
Percentage of calls answered before 15s
Percentage of calls abandoned after 15s
Number of available agents to take calls
Number of pending calls not answered yet
You can configure which statistic is displayed in those squares - see Configure queue statistics displayed.
Queue details and configuration
By clicking on the name of the queue, a modal will appear. Supervisors with no access to dissuasion will see some details about the queue. Administrators and supervisors who have access to the dissuasion will see different tabs :
One tab showing some information about the queue
One tab to configure the dissuasion in case of an exceptional closing for this queue.
Configuring the dissuasion for a queue
In the configuration tab, click on the title “Failed Destination”. A dropdown appears, showing the sound files and/or the queue that can be set up as a failed destination. The failed destination can be changed from this dropdown.
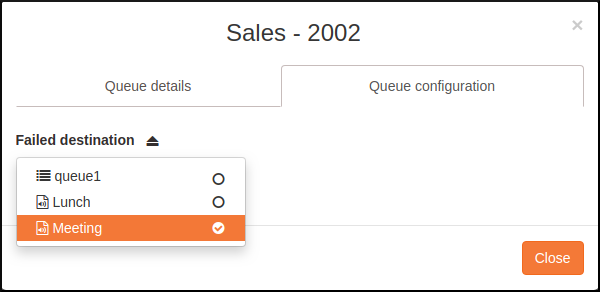
To change the failed destination options for this queue, see Activity’s Failed Destination Configuration section.
Editing Agent Configuration
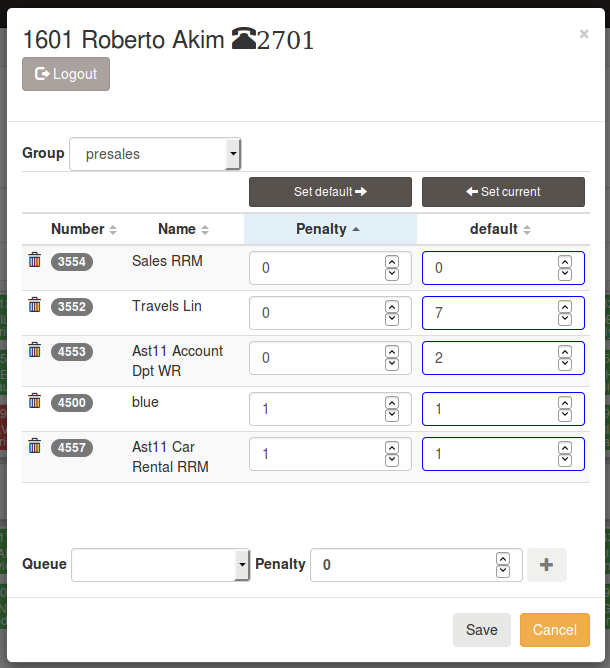
This interface allows a user to change queue assignement and the associated penalty. The queue table display the following columns
“Number”: The queue number
“Name”: The queue name
“Penalty”: The active penalty for the corresponding queue
“default”: The default penalty for the corresponding queue
The queue/active penalty couples can be saved as default configuration by clicking the “Set default” button, then “Save”. The queue/default penalty couples can be saved as active configuration by clicking the “Set current” button, then “Save”.
Note
Removing an agent from a queue
Emptying the penalty textbox and saving will remove the queue from the active configuration for the agent.
Emptying the default textbox and saving will remove the queue from the default configuration for the agent.
Multiple Agent Selection
From agent view you are able to add or remove more than one agent at the same time.
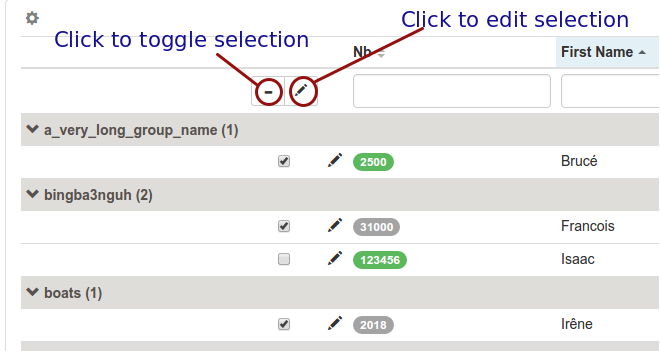
Once the agent selection is done, click on the edit button to display the configuration window

Click on the plus button to add a queue for selection, click on the minus button to remove a queue to the selection. Once queue to add or removed are choosen, click on save button to apply your configuration change.
Click on “Apply default configuration” to apply existing default configuration to all selected users and make it the active configuration. This action only affects users with an existing default configuration, agents whithout default configuration remain unchanged.
Agent Base Configuration
From the agent view, after selecting one or more agents, you can create a base configuration by clicking on one of the menu item in the following drop down:
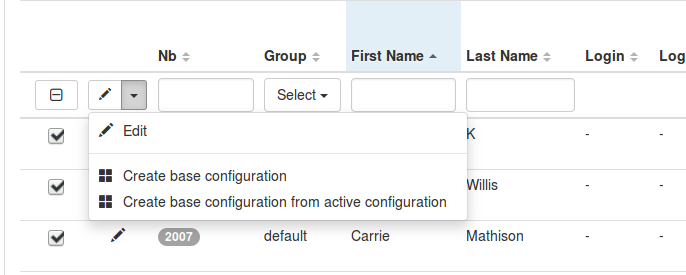
‘Create base configuration’ will allow you to create a base configuration from scratch for all the selected agents.
‘Create base configuration from active configuration’ will allow you to create a base configuration using the selected agents active configuration. The queue membership and penalty populated will be built based on the merged membership of all the selected agents. In case of conflict, the lowest penalty will be used.
In both cases, you will be able to review your changes before applying them. The ‘Create base configuration’ popup is similar to the single agent edition popup:
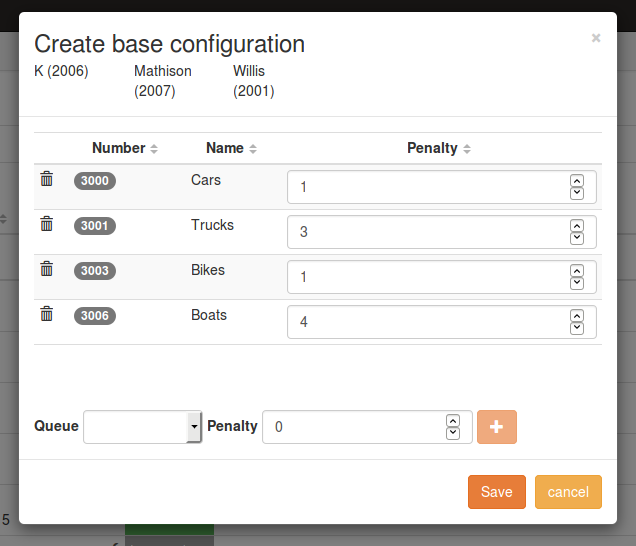
The queue table display the following columns:
“Number”: The queue number
“Name”: The queue name
“Penalty”: The active penalty for the corresponding queue
Click on the plus button to add a queue for selection. Once your configuration is complete, click on save button to apply your configuration change.
Applying Default Configuration
In order to re-apply or apply a default configuration, you may select agent whose base configuration is different from active configuration.
In the agent view, you will find a new column (Base config.) displaying if the base configuration is different from the active one:
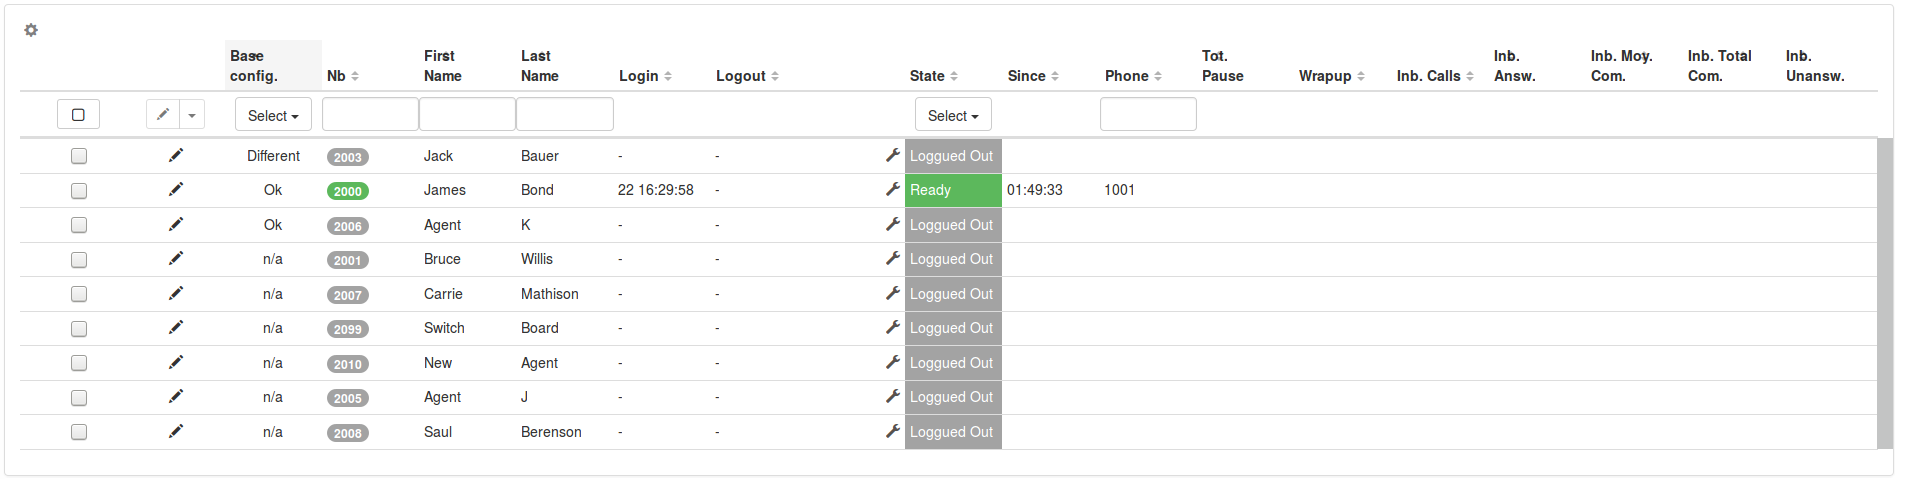
The possible values for this field are:
“n/a”: The base configuration is not available for this agent
“Ok” : The base configuration match the active configuration
“Different”: The base configuration does not match the active configuration
You can use this column to filter agent whose base configuration is different from the active one and then apply the default configuration by using the “Edit agent” option.
Queue Recording
Description
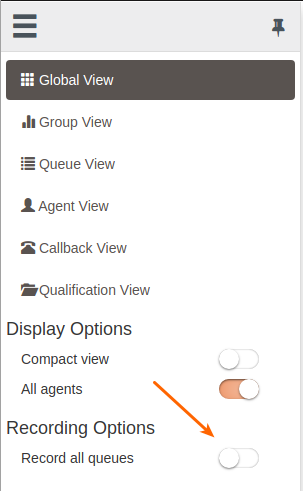
Once you setup queue recording in XiVO (see Enable recording in the Queue configuration), visual indicators are displayed next to queue name in Global view. Respectively following icons represents recording mode set on the queue.

Furthermore shortcut action is displayed in the left menu to control the activation / deactivation of all recorded queues. The switch will change its position in case the queue’s recording status is activated / deactivated through XiVO Web Interface accordingly.
Global recording activation
The switch button will either activate all queues configured with recording mode set (Recorded or Recorded on demand), or stop the recording feature for all queues.
Note
Action is applied only for next calls. Ongoing call recording is not started nor stopped when switch is triggered.
Thresholds
Additional Queue statistics columns
It is possible to add columns to reflect more performance indicators, such as Percentage of calls answered/abandoned within XX seconds. See Configuration to add such stats thresholds.

Colors
Color thresholds can be define for the waiting calls counter and the maximum waiting time counter
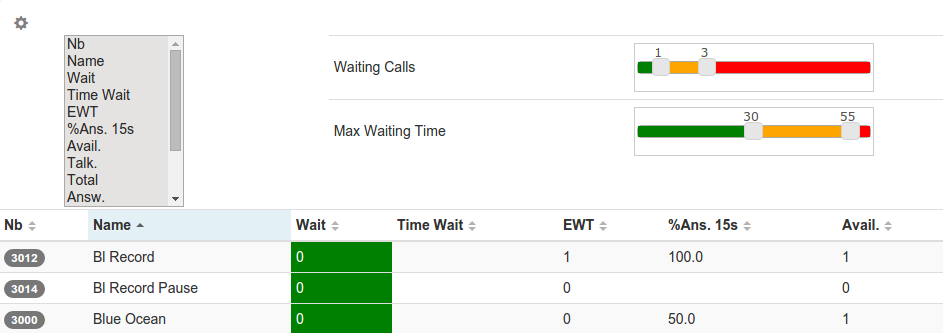
Once done, it is applied to the queue view and the global view
Callbacks
This view allows to manage callback request see Managing Callbacks Using CCManager for details.
Exporting qualifications
This view allows to export calls qualification see Call Qualifications.
To export the qualification answers, open Qualifification View page.
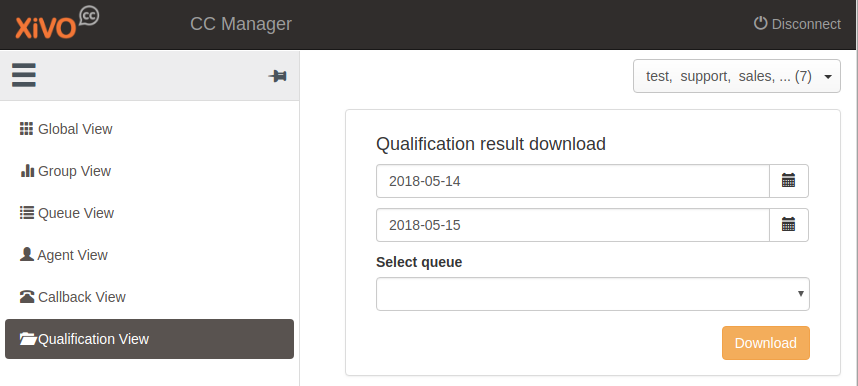
Select the date from, date to and queue. Then click to Download button. This will open new page with CSV file to download.
Warning
When exporting data from the same day, select date to to be +1 day of date from.
Footnotes