xivo-auth Developer’s Guide
Architecture
xivo-auth contains 4 major components, an HTTP interface, a celery worker, authentication backends and a consul client. All operations are made through the HTTP interface, tokens are stored by consul as well as the persistence for some of the data attached to tokens. The celery worker is used to schedule tasks that outlive the lifetime of the xivo-auth process. Backends are used to test if a supplied username/password combination is valid and provide the xivo-user-uuid.
xivo-auth is made of the following modules and packages.
plugins
the plugin package contains the xivo-auth backends that are packaged with xivo-auth.
http
The http module is the implementation of the HTTP interface.
Validate parameters
Calls the backend the check the user authentication
Forward instructions to the token_manager
Handle exceptions and return the appropriate status_code
controller
The controller is the plumbin of xivo-auth, it has no business logic.
Start the HTTP application
Start the celery worker
Load all enabled plugins
Instanciate the token_manager
token
The token modules contains the business logic of xivo-auth.
Creates and delete tokens
Creates ACLs for XiVO
Schedule token expiration
Read/write token data to consul
tasks
The tasks module contains implementation of celery tasks that are executed by the worker.
Called by the celery worker
Forwards instructions to the token manager
extension
This is a place holder for a global variable for the celery app. It will be removed and should not be used.
Other modules that should not need documentation are helpers, config, interfaces
Plugins
xivo-auth is meant to be easy to extend. This section describes how to add features to xivo-auth.
Backends
xivo-auth allows its administrator to configure one or many sources of authentication. Implementing a new kind of authentication is quite simple.
Create a python module implementing the backend interface.
Install the python module with an entry point xivo_auth.backends
An example backend implementation is available here.
Internal services
To simplify authentication of internal services without renewing the Token we have added a command line tool xivo-auth-static-token-manager to manage static tokens. Currently you can get a static token, which is created automatically during the installation. The same tool can be used to create a new one if needed. The static token is created with default acl: confd.users.read.
Call to confd from the Webi
In legacy webi PHP code, calls to confd are done server side through the internal confd port (listening only on localhost). On this endpoint, no authentication is necessary.
While moving some part of the webi code towards Js, needed calls to confd are done client side and therefore can only be done through the external confd port (listening on all IP interfaces). On this endpoint authentication is needed.
The following schema summarizes the approach:
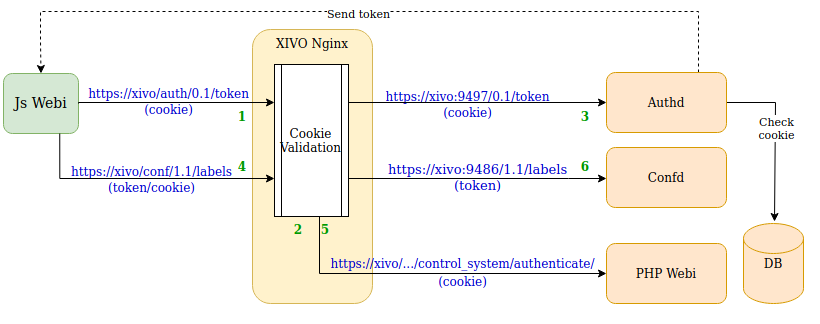
Given a webi administrator is logged in the webi and opens a menu rewritten in Js:
Js client asks a token to authd, sending its Webi cookie
This call is proxified via Nginx to authd which first asks the Webi to validate the cookie before proxifying the request
authd returns a token based on the cookie. For this :
it validates the cookie via the Webi
it creates a token with ACL based on the logged webi admin’s permission (see XiVO Session backend and Webi permission to Confd ACL mapping)
Js client calls confd API with token (and cookie)
This call is proxified via Nginx to confd which first asks the Webi to validate the cookie before proxifying the request
Confd returns result
Webi permission to Confd ACL mapping
Here’s how the mapping between webi permission to confd ACL is done:
the XiVO Session backend retrieve the webi admin user and its configured webi permissions
these webi permissions are converted to a python dict
which is then flattened, read and compared to a mapping dict named WEBI_PERMS_TO_CONFD_ACL to retrieve the correct ACLs
If you want to add a mapping you simply have to edit the WEBI_PERMS_TO_CONFD_ACL dict to add a new mapping
between a menu path to an confd ACL or list of ACL.