Configuring a NAT Environment
This is a configuration example to simulate the case of a hosted XiVO, i.e. an environment where:
- the XiVO has a public IP address
- the phones are behind a NAT
In this example, we’ll reproduce the following environment:
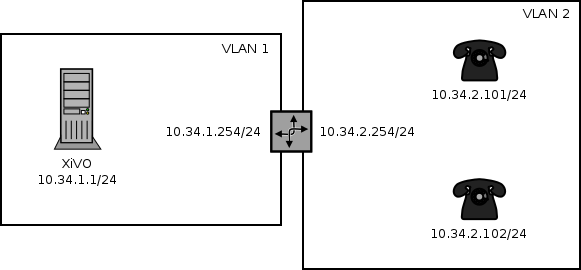
Phones behind a NAT
Where:
- the XiVO is installed inside a virtual machine
- the host machine is used as a router, a NAT and a DHCP server for the phones
- the phones are in a separate VLAN than the XiVO, and when they want to interact with it, they must pass through the NAT
With this setup, we could also put some phones in the same VLAN as the XiVO. We would then have a mixed environment, where some phones are behind the NAT and some phones aren’t.
Also, it’s easy to go from a non-NAT environment to a NAT environment with this setup. What you usually have to do is only to switch your phone from the “XiVO” VLAN to the “phones” VLAN, and reconfiguring the lines on your XiVO.
The instruction in this page are written for Debian jessie and VirtualBox.
Prerequisite
On the host machine:
- 1 VLAN network interface for the XiVO. In our example, this will be
eth0.341, with IP 10.34.1.254/24. - 1 VLAN network interface for the phones. In our example, this will be
eth0.342, with IP 10.34.2.254/24.
On the guest machine, i.e. on the XiVO:
- 1 network adapter attached to the “XiVO” VLAN network interface. In our example, this interface inside the virtual machine will have the IP 10.34.1.1/24.
Configuration
On the host, install the ISC DHCP server:
apt-get install isc-dhcp-server
If you do not want it to always be started:
systemctl disable isc-dhcp-server.service
Edit the DHCP server configuration file
/etc/dhcp/dhcpd.conf. We need to configure the DHCP server to serve network configuration for the phones (Aastra and Snom in this case):ddns-update-style none; default-lease-time 3600; max-lease-time 86400; log-facility daemon; option space Aastra6700; option Aastra6700.cfg-server-name code 2 = text; option Aastra6700.contact-rcs code 3 = boolean; class "Aastra" { match if substring(option vendor-class-identifier, 0, 6) = "Aastra"; vendor-option-space Aastra6700; option Aastra6700.cfg-server-name = "http://10.34.1.1:8667/Aastra"; option Aastra6700.contact-rcs false; } class "Snom" { match if substring(option vendor-class-identifier, 0, 4) = "snom"; option tftp-server-name = "http://10.34.1.1:8667"; # the domain-name-servers option must be provided for the Snom 715 to work properly option domain-name-servers 10.34.1.1; } subnet 192.168.32.0 netmask 255.255.255.0 { } subnet 10.34.1.0 netmask 255.255.255.0 { } subnet 10.34.2.0 netmask 255.255.255.0 { authoritative; range 10.34.2.100 10.34.2.199; option subnet-mask 255.255.255.0; option broadcast-address 10.34.2.255; option routers 10.34.2.254; option ntp-servers 10.34.1.1; }If you have many network interfaces on your host machine, you might also want to edit
/etc/default/isc-dhcp-serverto only include the “phones” VLAN network interface in the “INTERFACES” variable.Start the isc-dhcp-server:
systemctl start isc-dhcp-server.service
Add an iptables rules to do NAT:
iptables -t nat -A POSTROUTING -o eth0.341 -j MASQUERADE
Make sure that IP forwarding is enabled:
sysctl -w net.ipv4.ip_forward=1
Put all the phones in the “phones” VLAN on your switch
Activate the
NATandMonitoringoptions on the page of your XiVO.
Note that the iptables rules and the IP forwarding setting are not persistent. If you don’t make them persistent (not documented here), don’t forget to reactivate them each time you want to recreate a NAT environment.