Installation
This page describes how to install the XiVO CC.
It describes the installation with the debian package of the whole XiVO CC.
Note
As a reference, the manual installation page is here Manual configuration and installation.
Warning
- the wizard MUST be passed on the XiVO PBX
- XiVO PBX will be reconfigured during the installation and must be restarted. You may accept the automatic restart during the installation or you need to restart it manually later before starting the docker containers.
- If you configure HA on XiVO, you have to reconfigure postgres for CC …
Overview
The following components will be installed :
- XuC : outsourced CTI server providing telephony events, statistics and commands through a WebSocket
- XuC Management : supervision web pages based on the XuC
- Pack Reporting : statistic summaries stored in a PostgreSQL database
- Totem Support : near-real time statistics based on ElasticSearch
- SpagoBI : BI suite with default statistic reports based on the Pack Reporting
- Recording Server : web server allowing to search recorded conversations
- Xuc Rights Management : permission provider used by XuC and Recording Server to manage the user rights
Prerequisites
We will assume your XiVO CC server meets the following requirements:
- OS : Debian 8 (jessie), 64 bits.
- you have a XiVO PBX installed in a compatible version (basically the two components XiVO and XiVO CC have to be in the same version).
- the XiVO PBX is reachable on the network (ping and ssh between XiVO CC and XiVO PBX must be possible).
- the XiVO PBX is setup (wizard must be passed) with users, queues and agents, you must be able to place and answer calls.
For the rest of this page, we will make the following assumptions :
- the XiVO PBX has the IP 192.168.0.1
- some data (incoming calls, internal calls etc.) might be available on XiVO (otherwise, you will not see anything in the check-list below).
- the XiVO CC server has the IP 192.168.0.2
XiVO PBX Restrictions and Limitations
XiVO PBX enables a wide range of configuration, XiVO-CC is tested and validated with a number of restriction concerning configurations of XiVO PBX:
General Configuration
- Do not activate Contexts Separation in xivo-ctid Configuration
- Users deactivation is not supported
Queue Configuration
- Queue ringing strategy should not be Ring All
- Do not use pause on one queue status, in queue advanced configuration, autopause should be No or All
- Do not activate Call a member already on (Asterisk ringinuse) on xivo queue advanced configuration
User And Agent Configuration
- All users and queues have to be in the same context
- Agent and Supervisors profiles should use the same Presence Group
- Agents and Phones should be in the same context for mobile agents
- Agents must not have a password in XiVO agent configuration page
- All users must have the supervision on the XiVO (IPBX-Users-Edit-Services-Enable supervision checked)
- When and agent is disassociated from its user, xuc server has to be restarted.
- We strongly advise to not delete any user or agent to keep reporting available for them. Even so when an agent is deleted, xuc server has to be restarted.
Install from repository
The installation and configuration of XiVO CC (with its XiVO PBX part) is handled by the xivocc-installer package which is available in the repository.
Install process overview
The install process consists of three parts:
- The first part is to manually run the
install-docker.shscript to install docker and docker compose. - The second part is the installation of XiVO CC itself.
- The third part is to install the extra package for the recording.
The installation is automatic and you will be asked few questions during the process:
- When asked to generate a pair of authentication keys, leave the password field empty.
- Before copying the authentication keys, you will be prompted for the XiVO PBX root password.
- Enter IP addresses of XiVO PBX and XiVO CC.
- XiVO PBX must restart, the question will prompt you to restart during the process or to restart later.
Install Docker and Docker Compose
Note
To be run on the XiVO CC server
On a fresh debian install you will probably need to install the ca-certificates package:
apt-get install ca-certificates
Now you can download the script which will install docker and docker compose.
First, download the install-docker.sh script (in the following URL, replace CURRENT_VERSION with the current version, e.g. 2017.03):
wget https://gitlab.com/xivo.solutions/packaging/raw/CURRENT_VERSION/install/install-docker.sh -O install-docker.sh
And execute the script:
chmod +x install-docker.sh
./install-docker.sh
Install ntp server
Note
To be run on the XiVO CC server
The XiVO CC server and the XiVO PBX server must be synchronized to the same NTP source.
apt-get install ntp
Recomended configuration : you should configure the NTP server of the XiVO CC server towards the XiVO PBX. In our example it means to add the following line in the file /etc/ntp.conf:
server 192.168.0.1 iburst
Install XiVO CC
Note
To be run on the XiVO CC server
This step will install the XiVO CC components via the xivocc-installer package. It is required to restart XiVO PBX during or after the setup process.
The installer will ask whether you wish to restart XiVO PBX later.
Warning
- This package must be installed on the XivoCC server.
- Wizard MUST be passed on the XiVO PBX.
- XiVO PBX services will need to be restarted. The installer will ask whether you wish to restart XiVO PBX during or after the setup process.
Also, check that you have following information:
- XiVO PBX root password;
- OpenSSH
PermitRootLoginset toyes(you could revert tonoafter installation of XivoCC);- XiVO PBX’s IP address;
- XiVO CC DNS name or IP address (the one visible by XiVO PBX);
- Number of weeks to keep statistics;
- Number of weeks to keep recordings (beware of space disk);
The number of weeks to keep statistics must be higher than the number of weeks to keep recordings. Recording purging is based on the statistic data, so the statistic data must not be removed before purging recordings.
Install the xivocc-installer package via apt:
Add the sources list with the key (in the following URL, replace CURRENT_VERSION with the current version, e.g. 2017.03):
echo "deb http://mirror.xivo.solutions/archive/ xivo-solutions-CURRENT_VERSION-latest main" > /etc/apt/sources.list.d/xivo-solutions.list
wget http://mirror.xivo.solutions/xivo_current.key -O - | apt-key add -
Update your source list and install the package:
apt-get update
apt-get install xivocc-installer
After-install steps
After a successful installation, start docker containers using the installed xivocc-dcomp script:
xivocc-dcomp up -d
If you choose to restart XiVO PBX later, please do so as soon as possible to apply the modifications made by the installer. Until then, the XiVO CC server will not be able to connect correctly to the database on XiVO PBX.
Note
Please, ensure your server date is correct before starting. If system date differs too much from correct date, you may get an authentication error preventing download of the docker images.
To restart XiVO services, on XiVO PBX server run
xivo-service restart all
Reinstallation
To reinstall the package, it is required to run apt-get purge xivocc-installer then apt-get install xivocc-installer. This will re-run the configuration
of the package, download the docker compose template and setup XiVO PBX.
Purging the package will also remove the xuc and stats users from the XiVO PBX database.
Known Issues
- To avoid uninstallation problems:
- please use the following command to uninstall
apt-get purge xivocc-installer - if the process is aborted, it will break the installation. Then run
apt-get purgeandapt-get installagain
- please use the following command to uninstall
Checking Installed Version
Version of the running docker containers can be displayed by typing (see Show containers and images versions for other commands):
xivocc-dcomp version
Component version can also be found in the log files and on the web pages for web components.
Using XivoCC
The various applications are available on the following addresses:

- Xuc-related applications: http://192.168.0.2:8070/
- SpagoBI: http://192.168.0.2:9500/
- Config Management: http://192.168.0.2:9100/
- Recording server: http://192.168.0.2:9400/
- Kibana: http://192.168.0.2/
Post Installation
User Configuration
You should configure users and their rights in the Configuration manager http://192.168.0.2:9100/ (default user avencall/superpass).
Warning
If you change the cti login username in xivo configuration, user has to be recreated with apropriate rights in configuration manager.
SpagoBI
To configure SpagoBI, go to http://192.168.0.2:9500/SpagoBI (by default login: biadmin, password: biadmin).
Update default language
- Go to “⚙ Resources” > “Configuration management”
- In the “Select Category” field, chose “LANGUAGE_SUPPORTED”
- change value of the label “SPAGOBI.LANGUAGE_SUPPORTED.LANGUAGE.default” in your language : fr,FR , en,US , …
Upload Sample Reports
- Download the sample reports from https://gitlab.com/xivocc/sample_reports/raw/2018.05/spagobi/samples_before_borealis_v15.zip
- Import zip file in SpagoBI:
- “Repository Management” -> “Import/Export”
- Click on “Browse/Choose your file” and choose the previous
samples_before_borealis_v15.zipdownloaded file - Click on “Import”
- Click next with default options until you are asked to override metadata, set Yes as shown in screen below
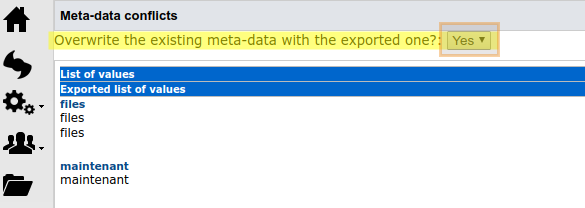
You can now browse the sample reports in Document->Rapports->Exemples.
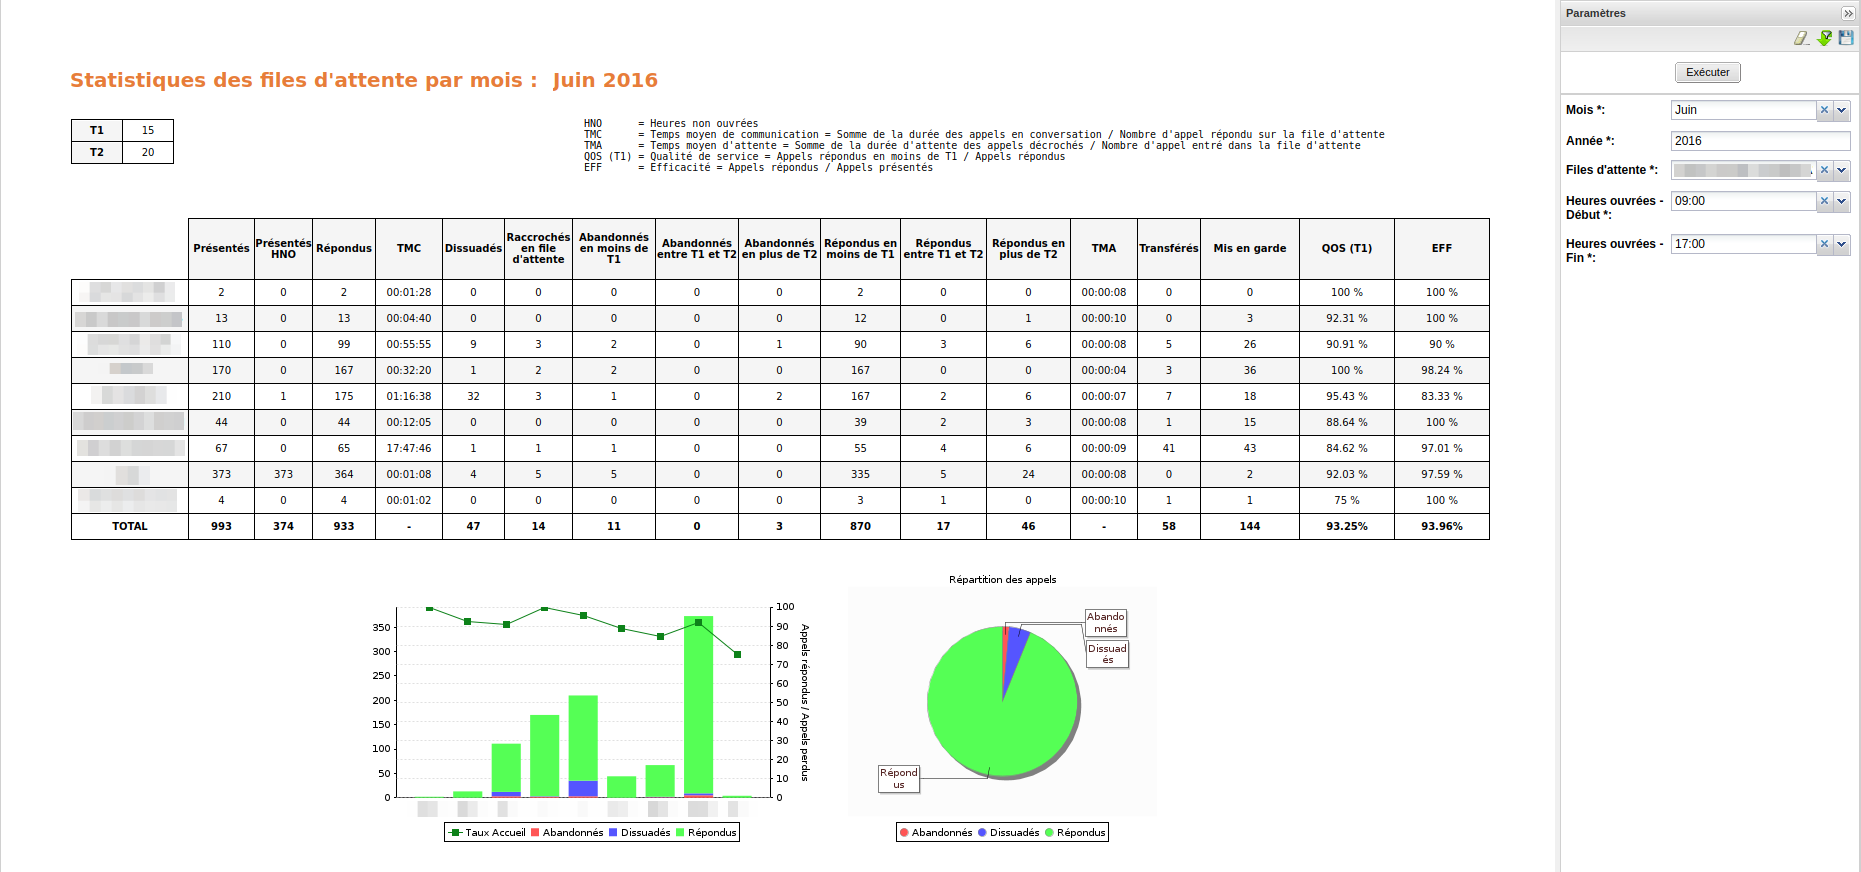
XivoCC Report Sample
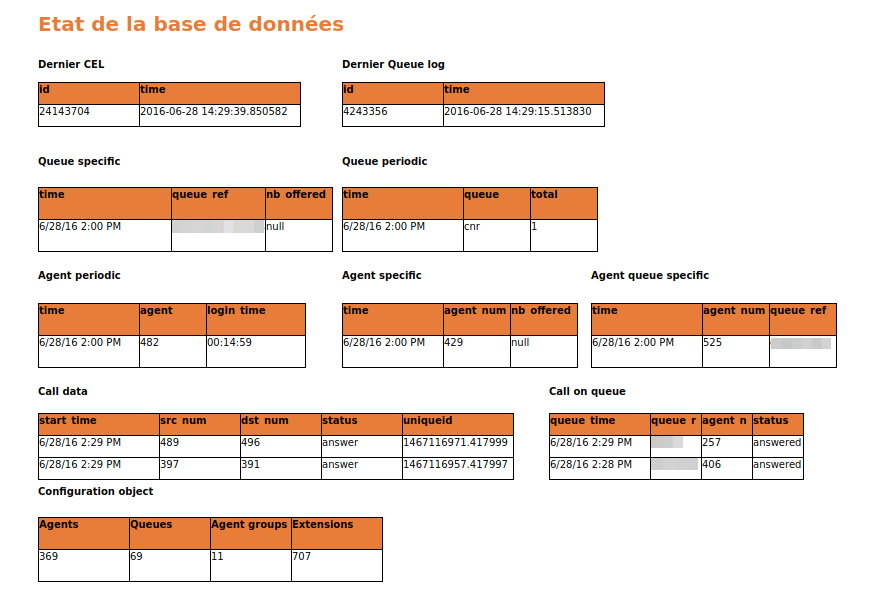
Use the database status report to check if replication and reporting generation is working :
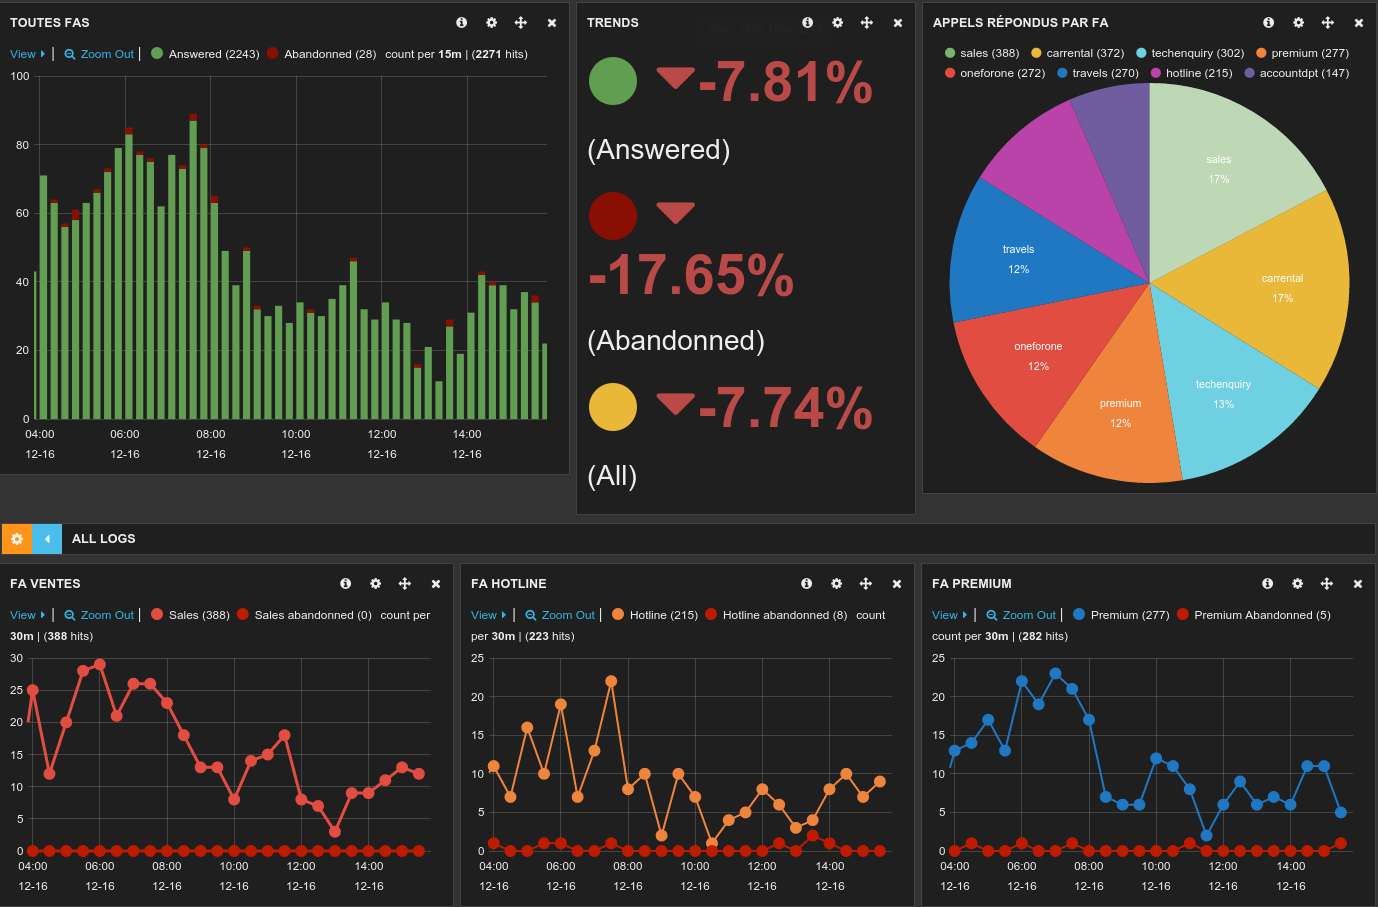
Totem Panels
Data replication can take some time if there are a lot of data in xivo cel and queue log tables. You may check xivo-db-replication log files (/var/log/xivocc/xivo-db-replication.log).
Preconfigured panels are available on http://@IP/kibana/#/dashboard/file/queues.json et http://@IP/kibana/#/dashboard/file/agents.json to be able to save this panels in elasticsearch database you have to sign on on request user admin/Kibana
Post Installation Check List
- All components are running : xivocc-dcomp ps
- Xuc internal database is synchronized with xivo check status page with http://xivoccserver:8090/
- CCManager is running, log a user and check if you can see and manage queues : http://xivoccserver:8070/ccmanastandardreports
- Check database replication status using spagobi system report
- Check elasticsearch database status (totem panels) http://xivoccserver:9200/queuelogs/_status
- Check that you can listen to recordings http://xivoccserver:9400/
- Check totem panels http://192.168.85.102/kibana
Warning
Make sure to have few calls made in your XiVO, despite you will not see anything in totem or spagobi.
Recording
Note
To be run on the XiVO PBX server
Warning
Since 2017.03.02 xivo-recording and call-recording-filtering packages are deprecated and are replaced by package xivocc-recording.
In case of upgrade, see XiVO PBX specific upgrade procedure: XiVOCC Recording upgrade procedure.
Install on your XiVO PBX the debian package available in the repository.
apt-get install xivocc-recording
This package needs additional configuration steps, see:
- Recording configuration,
- and (optionally) Recording filtering configuration.
Recording on a Gateway
If you don’t want to record files on the XiVO PBX itself but on a XiVO PBX Gateway, you must install the gateway-recording
package (instead of the xivocc-recording):
apt-get install gateway-recording
For configuration of this package, see Gateway recording configuration.
ACD Outgoing Calls For Call Blending
Use the following only if you want to use “Least Recent” call distribution strategy and that outbound agent calls have to be taken into account by the distribution strategy.
By default, when your agents process incoming and outgoing calls, the call distribution will not take into account agents which are in outgoing calls in the least recent call strategy and at the end of an outgoing call there is no wrapup. So an agent can be distributed just after an outgoing calls even if another agent is free for a longer time, because the outgoing call is not taken into account by the distribution strategy.
You will find below how to improve that.
XiVO-CC agent can make outgoing calls through an outgoing queue. This brings the statistics and supervision visualization for outgoing ACD calls. However, some special configuration steps are required:
Configuration Steps
- You need to create an outgoing queue with a name starting with ‘out’, e.g. outbound.
- Agent will have to be logged on this queue
- This queue must be configured with preprocess subroutine xuc_outcall_acd, without On-Hold Music (tab General), Ringing Time must be 0 and Ring instead of On-Hold Music must be activated (both tab Application).
- The subroutine must be deployed on the Xivo server (to /etc/asterisk/extensions_extra.d/ or through the web interface), the file is available from https://gitlab.com/xivo.solutions/xucserver/raw/master/xivo/outbound/xuc_outcall_acd.conf, with owner asterisk:www-data and rights 660.
- You must also deploy the file https://gitlab.com/xivo.solutions/xucserver/raw/master/xivo/skills/generate_agent_skills.py to /usr/local/sbin/, with owner root:root and rights 755.
- Furthermore, you must replace the file /etc/asterisk/queueskills.conf by the following one https://gitlab.com/xivo.solutions/xucserver/raw/master/xivo/skills/queueskills.conf (be sure to backup the original one), without changing the owner or rights
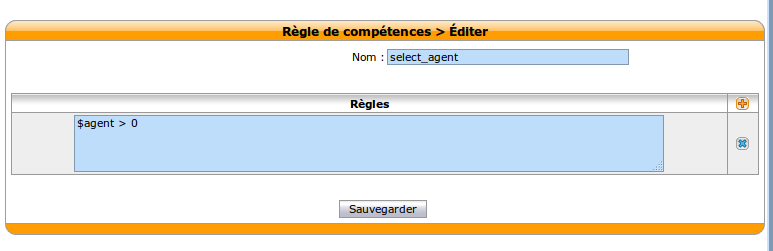
- And finally you need to add a new skill rule on the Xivo server: , with name ‘select_agent’ and rules ‘$agent > 0’.
Note
you can use xivo-fix-paths-rights command to fix all file rights needed for the files
Reload the asterisk configuration core reload
How to check correct configuration :
Check if agent is logged in the outbound queue
jyl-rennes*CLI> queue show outbound
outbound has 0 calls (max unlimited) in 'ringall' strategy (0s holdtime, 0s talktime), W:0, C:0, A:0, SL:0.0% within 0s
Members:
  Agent/2500 (Local/id-19@agentcallback from SIP/ihvbur) (ringinuse disabled) (dynamic) (Not in use) (skills: agent-19) has taken no calls yet
No Callers
Check the skills attached to the agent by displaying it’s agent group
jyl-rennes*CLI> queue show skills groups agent-19
Skill group 'agent-19':
  - agent_19       : 100
  - agent_no_2500  : 100
  - genagent       : 100
If the agent dial an outbound call of more than 6 digits (default) you should see the internal queue statistics updated
jyl-rennes*CLI> queue show outbound
outbound has 0 calls (max unlimited) in 'ringall' strategy (0s holdtime, 34s talktime), W:0, C:1, A:0, SL:100.0% within 0s
   Members:
      Agent/2500 (Local/id-19@agentcallback from SIP/ihvbur) (ringinuse disabled) (dynamic) (Not in use) (skills: agent-19) has taken 1 calls (last was 1 secs ago)
   No Callers
Once done, calls requested by an agent through the Cti.js with more than 6 digits are routed via the outgoing queue. You can change the number of digits using the parameter xuc.outboundLength in the XuC’s configuration.
Ldap Authentication
Xuc
Configure LDAP authent for CCmanager, Web Assistant and Web Agent
You need to include in the compose.yml file a link to a specific configuration file by adding in xuc section a specific volume and an environment variable to specify the alternate config file location
xuc:

....

environment:
....
- CONFIG_FILE=/conf/xuc.conf

volumes:
- /etc/docker/xuc:/conf
Edit in /etc/docker/xuc/ a configuration file named xuc.conf to add ldap configuration (empty by default)
include "application.conf"

authentication {
  ldap {
    managerDN = "uid=company,ou=people,dc=company,dc=com"      # user with read rights on the whole LDAP
    managerPassword = "xxxxxxxxxx"                             # password for this user
    url = "ldap://ldap.company.com:389"                        # ldap URI
    searchBase = "ou=people,dc=company,dc=com"                 # ldap entry to use as search base
    userSearchFilter = "uid=%s"                                # filter to use to search users by login, using a string pattern
  }
}
Recreate the container : xivocc-dcomp up -d xuc
Kerberos Authentication
To enable Kerberos authentication and single sign on feature, you need to have an existing Kerberos infrastructure with a
Key Distribution Center and a Ticket Granting Service. You need to be able to create a service, construct a kerberos server configuration and export a keytab to perform the following configuration. This service must be on the kerberos realm used by your users and must match the dns name of the server hosting the XUC server (or the nginx reverse proxy server if you use one). For example, assuming you have a realm named MYDOMAIN, you can create a service named HTTP/xuc.mydomain and a dns entry for xuc.mydomain pointing the server hosting the XUC.
Warning
The created domain name must be trusted by the user’s browser.
Prerequisites
Create a service for the XUC host, for example:
addprinc HTTP/xuc.mydomain
Export the keytab file, for example:
ktadd -k xuc.keytab HTTP/xuc.mydomain
Warning
The bash commands detailed here are for demonstration only and needs to be adapted to your specific environment. It shows how to create a service for the XUC Server named HTTP/xuc, associated to the example realm mydomain.
Only the following encryption types are supported by XiVOCC:
- aes256-cts-hmac-sha1-96
- arcfour-hmac
- des3-cbc-sha1
- des-cbc-crc
XiVOCC Configuration
Download the Zulu Cryptography Extension Kit from http://www.azulsystems.com/products/zulu/cryptographic-extension-kit
Extract the content of the downloaded file
ZuluJCEPolicies.zipon the server hosting the XUC docker container in the folder/etc/docker/xuc/(Folder should contain at leastlocal_policy.jar&US_export_policy.jarfiles)Copy the previously generated
xuc.keytabkeytab file to the server hosting the XUC docker container, for example:/etc/docker/kerberos/xuc.keytab.Create or edit the file
/etc/krb5.confon the server hosting the XUC docker container and change settings according to your kerberos environment. For example, the file may contain (name and ip addresses must match your kerberos environment):[libdefaults] default_realm = MYDOMAIN [realms] MYDOMAIN = { kdc = 172.17.0.14 admin_server = 172.17.0.14 }
Edit the docker compose file
/etc/docker/compose/docker-xivocc.ymlto add the following configuration in the xuc section (file name, service name, password may differ on your setup):xuc: # ... environment: - JAVA_OPTS=-Dsecured.krb5.principal=HTTP/xuc.mydomain -Dsecured.krb5.password=xuc -Dsecured.krb5.keyTab=/etc/kerberos/xuc.keytab # ... volumes: - /etc/docker/kerberos:/etc/kerberos - /etc/docker/xuc/local_policy.jar:/usr/lib/jvm/zulu-8-amd64/jre/lib/security/local_policy.jar - /etc/docker/xuc/US_export_policy.jar:/usr/lib/jvm/zulu-8-amd64/jre/lib/security/US_export_policy.jar - /etc/krb5.conf:/etc/krb5.conf
Enable
Single Sign Onon the Agent, Manager, Web and Desktop assistant interface. Change the value of the following environment variables in the /etc/docker/compose/custom.env:# ... USE_SSO=true XUC_HOST=xuc.mydomain # ...
Browser configuration
The created domain name must be trusted by the user’s browser.
For Chrome (windows):
- Internet Option : Add domain with protocol to the list of trusted sites : http://xuc.mydomain (and/or https://xuc.mydomain ).
Warning
Kerberos authentication on Chrome is only available on Microsoft Windows.
For Firefox:
- Go to
about:config - add domain (without protocol) to the
network.negotiate-auth.delegation-urisentry (ie.xuc.mydomain). - add domain (without protocol) to the
network.negotiate-auth.trusted-urisentry (ie.xuc.mydomain).
Install trusted certificate for nginx
To install a trusted certificate for the nginx reverse proxy instead of the self signed certificate, follow the following instructions:
- in directory
/etc/docker/nginx/sslreplace content of filesxivoxc.crt,xivoxc.csrandxivoxc.keywhile keeping filenames unchanged - restart nginx container by command
xivocc-dcomp restart nginx.
Warning
When configuring the certificate, please ensure the certificate chain is complete, especially for the XiVO Mobile Assistant. You can check the server certificate chain by using the following web site https://www.ssllabs.com/ssltest/analyze.html which will warn you if there is an error with the certificate (Chain issues - Incomplete)
What is a complete certificate chain
When a client application (browser or mobile application) checks a certificate for a web site, it checks the received certificate is issued by a known certificate authority and matches the web site domain name. But sometimes, the certificate is not issued by a root certificate authority but by an intermediate authority.
Here is an example of a such a certificate chain:
GeoTrust Global CA
|--> RapidSSL SHA256 - CA - G3
     |--> *.company.com
The possible problem here is that even if the browser knows the root authority, it is unaware of the intermediate one. The solution is to create a bundle of the complete certificate chain by concatenating the certificates of all parties (root, intermediate & site). Please see http://nginx.org/en/docs/http/configuring_https_servers.html#chains for more information.
Mobile Assitant
If using an HTTPS connection for the XiVO Mobile Assistant, you must use a trusted certificate with a complete certification chain, see Install trusted certificate for nginx.
