WebRTC
General notes
Note
added in version 2016.04
XiVO comes with a WebRTC lines support, you can use in with XiVO Web Assistant and Desktop Assistant. Before starting, please check the WebRTC Environment.
Current WebRTC implementation requires following configuration steps:
- configure asterisk to accept websocket connections,
- and create user with one line configured for WebRTC. To have user with both SIP and WebRTC line is not supported.
Configuration of XiVO PBX for WebRTC
Warning
Security warning: when enabling WebRTC you need to ensure that you do it securely:
- by securing the access to the ARI,
- and by securing (e.g. via an external firewall) the access to the asterisk HTTP server (which listens on port 5039).
First, secure ARI connection (this step is very important otherwise your XiVO PBX won’t be secure) :
Generate a password (e.g. with
pwgen -s 16)Edit file
/etc/asterisk/ari.confreplace:
password = Nasheow8Eag
by:
password = <YOUR_GENERATED_PASSWORD>
Then, update password in xivo-ctid-ng configuration,
Create a file
/etc/xivo-ctid-ng/conf.d/01-xivocc-webrtc.yml:touch /etc/xivo-ctid-ng/conf.d/01-xivocc-webrtc.yml
With the following content:
# Custom password
ari:
  connection:
      password: <YOUR_GENERATED_PASSWORD>
Then, open asterisk HTTP server to accept outside websocket connections:
Edit file
/etc/asterisk/http.confreplace:
bindaddr=127.0.0.1
by:
bindaddr=0.0.0.0
By default, asterisk HTTP server has a limit of 100 websocket connections. You can change this limit in the /etc/asterisk/http.conf file:
sessionlimit=200
Restart XiVO PBX services to apply the new settings:
xivo-service restart
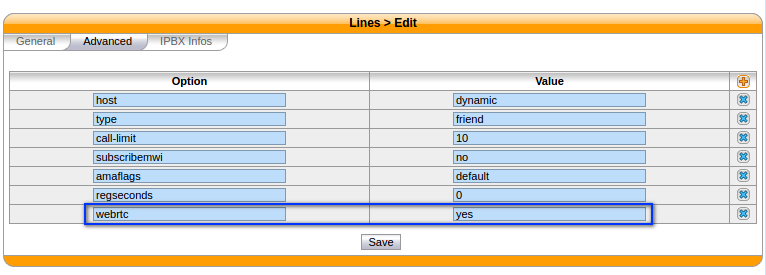
Configuration of user with WebRTC line
- Create user
- Add line to user without any device
- Edit the line created and, in the Advanced tab, add webrtc=yes options: