Installation
This page describes how to install the XiVO CC.
It describes the installation with the debian package of the whole XiVO CC.
Note
As a reference, the manual installation page is here Manual configuration and installation.
Warning
- the wizard MUST be passed on the XiVO PBX
- XiVO PBX will be reconfigured during the installation and must be restarted. You may accept the automatic restart during the installation or you need to restart it manually later before starting the docker containers.
- If you configure HA on XiVO, you have to re-configure postgres to accept connection of XiVO CC - see PostgreSQL configuration section
- By default XiVO CC installation will pre-empt network subnets 172.17.0.0/16 and 172.18.0.0/16 If this subnet is already used, some manual steps will be needed to be able to install XiVO CC. These steps are not described here.
Overview
The following components will be installed :
- XuC : outsourced CTI server providing telephony events, statistics and commands through a WebSocket
- XuC Management : supervision web pages based on the XuC
- Pack Reporting : statistic summaries stored in a PostgreSQL database
- Totem Support : near-real time statistics based on ElasticSearch
- SpagoBI : BI suite with default statistic reports based on the Pack Reporting
- Recording Server : web server allowing to search recorded conversations
- Xuc Rights Management : permission provider used by XuC and Recording Server to manage the user rights
Prerequisites
We will assume your XiVO CC server meets the following requirements:
- OS : Debian 11 (Bullseye), 64 bits.
- you have a XiVO PBX installed in a compatible version (basically the two components XiVO and XiVO CC have to be in the same version).
- the XiVO PBX is reachable on the network (ping and ssh between XiVO CC and XiVO PBX must be possible).
- the XiVO PBX is setup (wizard must be passed) with users, queues and agents, you must be able to place and answer calls.
For the rest of this page, we will make the following assumptions :
- the XiVO PBX has the IP 192.168.0.1
- some data (incoming calls, internal calls etc.) might be available on XiVO (otherwise, you will not see anything in the check-list below).
- the XiVO CC server has the IP 192.168.0.2
Architecture & Flows
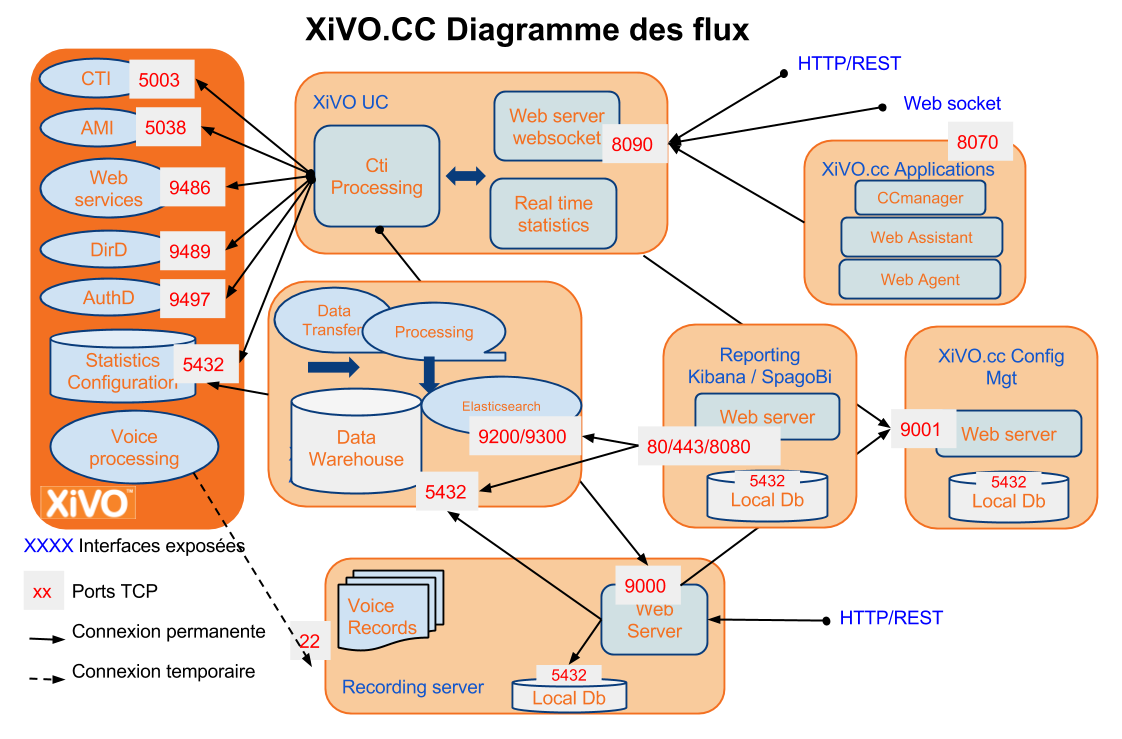
This diagram is very important and shows the architecture between the different components inside XiVO CC and also interactions with XiVO PBX components.
XiVO PBX Restrictions and Limitations
XiVO PBX enables a wide range of configuration, XiVO-CC is tested and validated with a number of restriction concerning configurations of XiVO PBX:
General Configuration
- Do not activate Contexts Separation in xivo-ctid Configuration
- Users deactivation is not supported
Queue Configuration
- Queue ringing strategy should not be Ring All
- Do not use pause on one queue or a subset of queues status, only pause or ready on all queues
- Do not activate Call a member already on (Asterisk ringinuse) on xivo queue advanced configuration
- When creating a new queue, this queue will not appear immediately in CCAgent and CCManager until the agent or the manager is not relogged to these applications accordingly.
- When deleting an existing queue, this queue will still appear in CCAgent and CCManager until the Xuc server is not restarted.
User And Agent Configuration
- All users and queues have to be in the same context
- Agent and Supervisors profiles should use the same Presence Group
- Agents and Phones should be in the same context for mobile agents
- Agents must not have a password in XiVO agent configuration page
- All users must have the supervision on the XiVO (IPBX-Users-Edit-Services-Enable supervision checked)
- When and agent is disassociated from its user, xuc server has to be restarted.
- We strongly advise to not delete any user or agent to keep reporting available for them. Even so when an agent is deleted, xuc server has to be restarted,
Install from repository
The installation and configuration of XiVO CC (with its XiVO PBX part) is handled by the xivocc-installer package which is available in the repository.
Install process overview
Note
If your server needs a proxy to access Internet, configure the proxy for apt
, wget
and curl
as documented in Proxy Configuration.
The install process consists of three parts:
- The first part is to manually run the
xivocc_install.sh
script to install the dependencies (ntp, docker, docker-compose…) and which will trigger the XiVO CC installation. - The second part is to install the extra package for the chat.
- The third part is to install the extra package for the recording.
The installation is automatic and you will be asked few questions during the process:
- Before copying the authentication keys, you will be prompted for the XiVO PBX root password.
- Enter IP addresses of XiVO PBX and XiVO CC.
- XiVO PBX must restart, the question will prompt you to restart during the process or to restart later.
Launch install script
Note
To be run on the XiVO CC server
Once you have your Debian Bullseye properly installed, download the XiVO CC installation script and make it executable:
wget http://mirror.xivo.solutions/xivocc_install.sh
chmod +x xivocc_install.sh
Running the script will install the XiVO CC components via the xivocc-installer
package. It is required to restart XiVO PBX during or after the setup process.
The installer will ask whether you wish to restart XiVO PBX later.
Warning
- Wizard MUST be passed on the XiVO PBX.
- XiVO PBX services will need to be restarted. The installer will ask whether you wish to restart XiVO PBX during or after the setup process.
Also, check that you have following information:
- XiVO PBX root password;
- OpenSSH
PermitRootLogin
set toyes
(you could revert tono
after installation of XivoCC); - XiVO PBX’s IP address;
- XiVO CC DNS name or IP address (the one visible by XiVO PBX);
- Number of weeks to keep statistics;
- Number of weeks to keep recordings (beware of disk space);
The number of weeks to keep statistics must be higher than the number of weeks to keep recordings. Recording purging is based on the statistic data, so the statistic data must not be removed before purging recordings.
Launch installation:
./xivocc_install.sh -a 2022.05-latest
After-install steps
Configure ntp server
The XiVO CC server and the XiVO PBX server must be synchronized to the same NTP source.
Recomended configuration : you should configure the NTP server of the XiVO CC server towards the XiVO PBX.
In our example it means to add the following line in the file /etc/ntp.conf
:
server 192.168.0.1 iburst
Adjust xuc memory
Xuc memory must be increased on these installations:
Condition | XUC Xmx | |
---|---|---|
Default | Required | |
> 50 agents or > 500 users | 2048m | 4096m |
- Set new variable in the
/etc/docker/compose/custom.env
file:
JAVA_OPTS_XUC=-Xms512m -Xmx4g
- Use the variable in the
/etc/docker/compose/docker-compose.yml
file:
xuc:
...
environment:
- JAVA_OPTS=${JAVA_OPTS_XUC}
Adjust Elasticsearch memory
By default on XIVO CC elasticsearch is started with 1.5Gb for the JVM. This may need to be adjusted depending on your setup (mostly depending on the number of calls per day).
See Elasticsearch memory management on how to do it.
Launch the services
Note
Please, ensure your server date is correct before starting. If system date differs too much from correct date, you may get an authentication error preventing download of the docker images.
After a successful installation, start docker containers using the installed xivocc-dcomp
script:
xivocc-dcomp up -d
To restart XiVO services, on XiVO PBX server run
xivo-service restart all
Reinstallation
To reinstall the package, it is required to run apt-get purge xivocc-installer
then apt-get install xivocc-installer
. This will re-run the configuration
of the package, download the docker compose template and setup XiVO PBX.
Purging the package will also remove the xuc and stats users from the XiVO PBX database.
Known Issues
- To avoid uninstallation problems:
- please use the following command to uninstall
apt-get purge xivocc-installer
- if the process is aborted, it will break the installation. Then run
apt-get purge
andapt-get install
again
- please use the following command to uninstall
Checking Installed Version
Version of the running docker containers can be displayed by typing (see Show containers and images versions for other commands):
xivocc-dcomp version
Component version can also be found in the log files and on the web pages for web components.
Using XivoCC
The various applications are available on the following addresses:
- Xuc-related applications: https://192.168.0.2
- SpagoBI: https://192.168.0.2/SpagoBI
- Config Management: https://<XiVO IP Address>/configmgt/ or https://192.168.0.2/configmgt/
- Recording server: https://192.168.0.2/recording
- Kibana: https://192.168.0.2/kibana
- Fingerboard: https://192.168.0.2/fingerboard
Chat Backend
Since Electra version, you MUST install and configure the chat backend to have the Chat feature working properly.
Installation type:
- UC Addon: the chat backend package must be installed on the XiVO PBX with the UC Addon.
- CC/UC mono-server: the chat backend package must be installed on your CC/UC server.
- CC/UC multi-server: the chat backend package must be installed on the server which hosts the
xuc
. You will be asked to give the IP Address of the server hosting thepgxivocc
.
Warning
Installing the Chat backend will configure a linux user on the host
with UID 2000. Therefore you should check that no user with UID 2000 (you can do it with command id 2000
)
is existing on the host before installing the Chat backend.
Warning
XiVO CC containers will be recreated. Therefore you must not install the chat backend before initialization of all databases in pgxivocc was completed. DB replication to the stats database must be also completed before installing the chat backend.
Chat Backend Installation
Install the
xivo-chat-backend
package on your XIVO CC (on the server hosting thexuc
server):apt-get install xivo-chat-backend
In case of multi-server installation remove the links section from
/etc/docker/compose/docker-xivo-chat-backend.yml
mattermost: ... - links: - - pgxivocc:db
When done, run the configuration script:
/var/lib/xivo-chat-backend/scripts/xivo-chat-backend-initconfig.sh
Note
This will configure
- the database
- the chat backend (currently mattermost server)
- and the link between xuc and mattermost services
Post Installation
User Configuration
You should configure users and their rights in the Configuration manager http://<XiVO IP Address>/configmgt/ (default user avencall/superpass).
Warning
If you change the cti login username in xivo configuration, user has to be recreated with apropriate rights in configuration manager.
SpagoBI
To configure SpagoBI, go to http://192.168.0.2/SpagoBI (by default login: biadmin, password: biadmin).
Update default language
- Go to “⚙ Resources” > “Configuration management”
- In the “Select Category” field, chose “LANGUAGE_SUPPORTED”
- change value of the label “SPAGOBI.LANGUAGE_SUPPORTED.LANGUAGE.default” in your language : fr,FR , en,US , …
Upload Statistics Reports
- Download the sample reports from https://gitlab.com/xivocc/sample_reports/-/raw/master/spagobi/samples_from_borealis_v23.zip For Contact Center reporting
- Import zip file in SpagoBI:
- Goto “Repository Management” -> “Import/Export”
- Click on “Browse/Choose your file” and choose the previous
*_vxx.zip
downloaded file- Click on “Import” icon
- Click next with default options until you are asked to override metadata, set Yes as shown in screen below
![]()
You can now browse the sample reports in Document->Rapports->Exemples.

Use the database status report to check if replication and reporting generation is working :

Totem Panels
You have to manually import demo dashboards in Kibana, see Totem Panels for required steps.
Post Installation Check List
- All components are running : xivocc-dcomp ps
- Xuc internal database is synchronized with xivo check status page with https://xivoccserver:8443/
- CCManager is running, log a user and check if you can see and manage queues : https://xivoccserver/ccmanager
- Check database replication status using spagobi system report https://xivoccserver/SpagoBI
- Check that you can listen to recordings https://xivoccserver/recording
- Check totem panels https://xivoccserver/kibana
Warning
Make sure to have few calls made in your XiVO, despite you will not see anything in totem or spagobi.
Recording
This feature needs additional configuration steps on XiVO PBX, see:
- Recording,
- and (optionally) Recording filtering configuration.